Finally got over a cold so I could record part 2 of my tutorial :)
You can play the game here on the PICO-8 website
A little soapbox for me to stand on and rant from.
Finally got over a cold so I could record part 2 of my tutorial :)
You can play the game here on the PICO-8 website
My first attempt at YouTube video/tutorial thing. Gonna try to get one of these done a week…
Got myself on the radio again last week talking about “scrubbing yourself from the Internet”. Here is the audio clip:
And here is a link to Daily Mail article about the Oblivion tool
This script uses qshape to print out the details of deferred emails in Postfix. Useful when monitoring delivery issues.
#!/bin/sh

while :
do
    sudo qshape deferred
    sleep 30
done
23114, 584, 46931, these three numbers were used to create the entire universe for Elite.
Released in 1984, Elite featured cutting edge 3D graphics (with hidden line removal no less) and a rich universe of 2048 planetary systems, spread across 8 galaxies, each with a unique name, offbeat description, technology level, government type and even an economy. It was an instant hit and it set the standard for space combat and trading simulators for years to come.
But the developers of Elite had a bit of a problem, the data for this universe took up a lot of memory, memory that the early microcomputers just did not have. In fact the data for the universe is several hundred kilobytes big. The BBC Micro, one of the launch platforms for the game, only had 32KB of RAM, large for computers of the time but not big enough to hold Elite’s universe, let alone the rest of the game.
So what did the developers do ? Well they used procedural content generation to generate the details of each planetary system as it was needed. In fact, Elite was one of the earliest games to use procedural content generation.
So how did it work? Luckily for us, Ian Bell, one of the authors of Elite, created a text based version of the game to “formalise and archive the definition of the Classic Elite Universe”. The C source code for Text Elite can be found here and I’m going to walk through it in this post, pointing out some of the interesting bits along the way.
So back to our three numbers. These are used as the “seed” of the universe and they are incremented and manipulated in a consistent manner as each galaxy and planetary system is generated. This allows the game universe to be the same for each player, even though the data is generated on the fly.
The basic outline of the process is as follows:
The source for this can be found in the aptly named buildgalaxy function:
/* Original game generated from scratch each time info needed */
void buildgalaxy(uint galaxynum)
{
 uint syscount, galcount;
 seed.w0 = base0; seed.w1 = base1; seed.w2 = base2; /* Initialise seed for galaxy 1 */
 for (galcount = 1; galcount<galaxynum; ++galcount) nextgalaxy(&seed);
 /* Put galaxy data into array of structures */
 for (syscount = 0; syscount<galsize; ++syscount) galaxy[syscount] = makesystem(&seed);
}
Note the comment that the original game generated the info from scratch every time it was need. Since we running on less memory constrained machines, Text Elite can generate all the planetary systems for a single galaxy in one hit.
base0, base1 and base2 are our three starting numbers, defined in hex in the code as:
const uint16 base0 = 0x5A4A;
const uint16 base1 = 0x0248;
const uint16 base2 = 0xB753;  /* Base seed for galaxy 1 */
The nextgalaxy and twist functions handle the adjustment of the seed as we step through the galaxies. This ensures that the seed is set up to generate a unique set of planetary systems for the galaxy we want. The source for these functions looks like this:
uint16 twist(uint16 x)
{
 return (uint16)((256 * rotatel(x >> 8)) + rotatel(x & 255));
}

void nextgalaxy(seedtype *s) /* Apply to base seed; once for galaxy 2 */
{
 (*s).w0 = twist((*s).w0); /* twice for galaxy 3, etc. */
 (*s).w1 = twist((*s).w1); /* Eighth application gives galaxy 1 again*/
 (*s).w2 = twist((*s).w2);
}
Basically some math and bitwise operations to shift the seed numbers left 8 bits.
With the seed set up for our galaxy, we can now generate its 256 planetary systems. The heart of this process is the makesystem function. It uses the current seed to populate a structure looking like this for each planetary system:
typedef struct
{
 uint x;
 uint y; /* One byte unsigned */
 uint economy; /* These two are actually only 0-7 */
 uint govtype;
 uint techlev; /* 0-16 i think */
 uint population; /* One byte */
 uint productivity; /* Two byte */
 uint radius; /* Two byte (not used by game at all) */
 fastseedtype goatsoupseed;
 char name[12];
} plansys;
Here is the makeystem function in all it’s glory:
/**-Generate system info from seed **/

plansys makesystem(seedtype *s)
{
 plansys thissys;
 uint pair1, pair2, pair3, pair4;
 uint16 longnameflag = ((*s).w0) & 64;

 thissys.x = (((*s).w1) >> 8);
 thissys.y = (((*s).w0) >> 8);

 thissys.govtype = ((((*s).w1) >> 3) & 7); /* bits 3,4 &5 of w1 */

 thissys.economy = ((((*s).w0) >> 8) & 7); /* bits 8,9 &A of w0 */
 if (thissys.govtype <= 1)
 {
 thissys.economy = ((thissys.economy) | 2);
 }

 thissys.techlev = ((((*s).w1) >> 8) & 3) + ((thissys.economy) ^ 7);
 thissys.techlev += ((thissys.govtype) >> 1);
 if (((thissys.govtype) & 1) == 1) thissys.techlev += 1;
 /* C simulation of 6502's LSR then ADC */

 thissys.population = 4 * (thissys.techlev) + (thissys.economy);
 thissys.population += (thissys.govtype) + 1;

 thissys.productivity = (((thissys.economy) ^ 7) + 3)*((thissys.govtype) + 4);
 thissys.productivity *= (thissys.population) * 8;

 thissys.radius = 256 * (((((*s).w2) >> 8) & 15) + 11) + thissys.x;

 thissys.goatsoupseed.a = (*s).w1 & 0xFF;;
 thissys.goatsoupseed.b = (*s).w1 >> 8;
 thissys.goatsoupseed.c = (*s).w2 & 0xFF;
 thissys.goatsoupseed.d = (*s).w2 >> 8;

 pair1 = 2 * ((((*s).w2) >> 8) & 31); tweakseed(s);
 pair2 = 2 * ((((*s).w2) >> 8) & 31); tweakseed(s);
 pair3 = 2 * ((((*s).w2) >> 8) & 31); tweakseed(s);
 pair4 = 2 * ((((*s).w2) >> 8) & 31); tweakseed(s);
 /* Always four iterations of random number */

 (thissys.name)[0] = pairs[pair1];
 (thissys.name)[1] = pairs[pair1 + 1];
 (thissys.name)[2] = pairs[pair2];
 (thissys.name)[3] = pairs[pair2 + 1];
 (thissys.name)[4] = pairs[pair3];
 (thissys.name)[5] = pairs[pair3 + 1];

 if (longnameflag) /* bit 6 of ORIGINAL w0 flags a four-pair name */
 {
 (thissys.name)[6] = pairs[pair4];
 (thissys.name)[7] = pairs[pair4 + 1];
 (thissys.name)[8] = 0;
 }
 else (thissys.name)[6] = 0;
 stripout(thissys.name, '.');

 return thissys;
}
As you can see the system’s location, government type and economy are generated by plucking bits out the seed. Next up, the tech level is determined (partially) from the seed and is then adjusted by the economy and government type.
Population is derived from the system’s tech level, economy and government type. Similarly its productivity is a function of its economy, government type and population. The system’s radius is derived from some arbitrary seed bits but is also affected by the system’s galactic x coordinate.
The goatsoupseed is an interesting bit. It is used as a seed for a pseudo-random number generator which, is used to generated the text description of the system using a text template. I won’t cover this step but have a look at the goat_soup function if you are interested in seeing how this works.
The rest of the function focuses on creating the name of the system. It does this by pulling pairs of letters out of the following strings:
char pairs[] = "..LEXEGEZACEBISO"
"USESARMAINDIREA."
"ERATENBERALAVETI"
"EDORQUANTEISRION"; /* Dots should be nullprint characters */
These pairs are made up of a vowel and a consonant and when combined create names that are generally pronounceable. Looking at the code you will see the same part of the seed is used to choose each of the letter pairs. To avoid the same pair being chosen each time, the tweakseed function is called after each selection. This function use a Fibonacci-like sequence to adjust the seed:
void tweakseed(seedtype *s)
{
 uint16 temp;
 temp = ((*s).w0) + ((*s).w1) + ((*s).w2); /* 2 byte aritmetic */
 (*s).w0 = (*s).w1;
 (*s).w1 = (*s).w2;
 (*s).w2 = temp;
}
A side effect of “tweaking” the seed like this, is that the next system to be generated gets its own unique seed to build from.
The upshot of this whole process is that we get planetary systems such as Lave (your starting system in the game and the 7th in galaxy 1):
or Enata in galaxy 3:
Additionally a list of trade goods are generated for each system. The list of available goods are based on planetary system’s economy type. The game also fluctuates the pricing and keeps track of availability as the player buys and sells goods. Have a look at the genmarket function if you want to see how this works.
As a fun exercise I hacked the Text Elite source to dump out a .csv file containing all the planetary systems. I then used a bit of Processing to generate this map showing the entire Elite universe. I have used the productivity of the planet to size each system and its government type to tweak it’s colour. Lave, your starting point in the game, I have highlighted in green. I have also plotted out the “jump lanes” between the systems as the game only allowed you to jump a maximum of 7 light years at a single time.

Well, that about wraps it up. Source for my hacked Text Elite and the Processing map generation code can be found here. I’d also suggest you check out these great writeups on how Frontier: Elite 2 did its universe creation. Also check out the dev dairy for the just released Elite: Dangerous which uses procedural content generation to create over 400 billion star systems.
If you enjoyed this post then check out my other posts on procedural content generation.
This is a quick, step by step guide to creating a simple app for Android using Unity. This tutorial is for windows but other then the install instructions it should work for other platforms. By the end of this tutorial you will have created an app that displays a red spinning cube on a blue background running on your Android device.
To create an Android app you need to install the Android SDK, which can be downloaded from here. I installed the SDK to c:\android-sdk
If you don’t have a Java Developer Kit (JDK) you will need to download one from here before you can install the Android SDK.
Once the SDK is installed, you need to add the Android 5.01 (API level 21) package to it. Run the SDK Manager and use it to download the API level 21 packages (it should all be selected by default). See here for more info.
Next, you will need to install the USB device drivers for your Android device. Whilst it is possible to use the Android Emulator, its performance is pretty bad so you are much better off testing on a real device. If you are using a “Nexus” device you can install its USB drivers using the SDK Manager, otherwise you will need to install your device’s specific drivers. See here for more info on setting up your USB driver.
You will need to enable USB debugging for your device. On Android 4.2 and higher, the Developer options screen is hidden by default. To make it visible, go to Settings -> About phone and tap Build number seven times. Return to the previous screen and select Developer options at the bottom and turn on USB debugging. On older versions of Android, go to Settings -> Applications -> Development and turn on USB debugging.
To test that everything is set up, plugin in your device, open a cmd prompt and run the following commands :
cd \android-sdk\platform-tools
adb devices</pre>
Your plugged in device should be listed. If not check your device as it may be prompting you to authorize your PC.
Download and install Unity 3D to its default location. The installer can be downloaded from here. Run Unity after the install is complete. You will need to create/login into a Unity account when you first run Unity.
Also, if you have never installed Unity before on your PC you will also be given the option to run Unity Pro for an evaluation period or to run the Free edition. This tutorial only requires the Free version of Unity and I suggest you start with the Free version. You can always upgrade at a later date. You can compare the different versions of Unity here.
Start Unity and select Create New Project in the Project Wizard, name the project RedCube and click Create (if you already have a project open, select File -> New Project to create a new project).
In the drop-down box in the upper right of the screen make sure 4 Split is selected.
From the GameObject menu select 3D Object and then select Cube. Make sure that Cube is selected in the Hierarchy panel (3rd panel along the top of the screen), then in the Inspector panel (far right panel) set the following values for the cube:
Select the Main Camera in the Hierarchy panel and set the following properties for the camera in the Inspector panel:
From the GameObject menu, select Light and then Point light. Set the following properties for the light:
Click on the Play button (top center of the screen). You should now see the lower left panel switch to the Game tab and you should see a white cube on a blue background.
Press the Play button again to stop the game.
Note, this important: Unity allows you to make changes whilst the game is running but these changes are lost as soon as you stop the game running. This is great for debugging but is an easy way to lose you changes :)
Speaking of losing your work, now is a good time to save your project. Select File -> Save Scene, enter RedCubeScene as the name for the scene when prompted. Then select File -> Save Project to save the project. Remember to save your work regularly.
Right click on the Assets folder in the Project panel (3rd along the bottom) and then select Create -> Material, name it RedMat. In the Inspector window click on the white color block next to Main Color and then select a red color from the color picker.
Drag the RedMat material from the Project window onto Cube in the Hierarchy window. The cube should now turn red in the various scene panels. If you are only seeing a wireframe outline of your cube in the Scene panels, select Textured from the Scene panel drop down menu that says Wireframe.
In Unity, scripts are used to add behaviors to objects and to create the logic of your game. We will use a script to make the cube spin.
Right click on the Assets folder in the Project panel and select Create -> C# Script, name it Spin.
In the Inspector window click the Open button, give it a moment for the MonoDevelop IDE to launch. You should see a code editor window. Modify the code to read as follows:
using UnityEngine;
using System.Collections;

public class Spin : MonoBehaviour {
    // Use this for initialization
    void Start () {
    }

    // Update is called once per frame
    void Update () {
        // rotate at 90 degrees per second
        transform.Rotate(Vector3.up * Time.deltaTime*90);
    }
}
Save the code (press Ctrl+S) and then switch back to the Unity editor.
Drag the Spin script from the Project window onto Cube in the Hierarchy window. Click on Cube in the Hierarchy panel. In the Inspector panel you should see that the cube now has the Spin script (and the RedMat) assigned to it.
Press the Play button. You should now see a red cube spinning in the Game window. Press Play again to stop the game.
Now that we have the app completed, we need to build it for Android.
Select Edit -> Project Settings -> Player
In the Inspector window under Cursor Hotspot click on the tab with the Android icon (4th tab along).
In the Other Settings section change the following values:
Now, select Edit -> Preferences and then select the External Tools section. Click on the Browse button next to Android SDK location and select the root folder of your Android SDK install (c:\android-sdk in my case).
Next plug-in your device.
Now, select File -> Build & Run, this will open the Build Settings window. Select Android under platform and then click on the Build & Run button, when prompted for a name for the .apk file enter in RedCube.
A build dialog will pop up and you will see the app being built followed by a message about the app getting pushed to your device.
Have a look at your device, you should see the RedCube app starting up, followed by a red cube spinning on a blue background.
Congratulations you have created your first Unity Android app !
If you are interested in creating 2D games with Unity then check out my Run Bunny, Run! tutorial series.
Otherwise go and complete the some of the Unity tutorials. These will give you a good understanding of how Unity works. Also check out the very comprehensive documentation and the very helpful community.
Have fun :)
After watching this fantastic interview with Sean Murray about No Man’s Sky I’ve been inspired to write a bit about procedural content generation. I’ve been tinkering with procedural content generation for years, using it for everything from creating games levels to generating sample data for testing and it is a fascinating subject.
So what is procedural content generation?
Wikipedia says “procedural generation is generating content algorithmically rather than manually… The term procedural refers to the process that computes a particular function”. The Procedural Content Generation Wiki suggests it “is the programmatic generation of game content using a random or pseudo-random process that results in an unpredictable range of possible game play spaces… procedural content generation should ensure that from a few parameters, a large number of possible types of content can be generated”.
That’s quite a mouthful! Basically the idea is to get the computer to generate content so you don’t have to :)
To get the ball rolling I’m going to start with Lindenmayer systems or L-systems. Developed by Hungarian biologist Aristid Lindenmayer in 1968 to describe and model the growth of plants, L-systems can be used to generate amazingly complex structures from a set of very simple rules.
An L-system is represented by a simple string of characters (much like a DNA string) for example “FG+G-F. A very simple system would consist of just a single letter, for example “F”.
It also has bunch of rules. These are simple substitutions that define how each letter in the system should be replaced or expanded.
For example we might have two rules that say “F=G-F-G” and “G=F+G+F”, which basically says replace all F’s with “G-F-G” and replace all G’s with “F+G+F”.
To generate our output we simply iterate a number of times, applying the rules to the result of the previous iteration.
For example if we start with:
And we iterate once, we get:
G-F-G
If we iterate again (applying the rules again), we get:
F+G+F-G-F-G-F+G+F
And after you iterate 5 times you land up with this enormous string:
G-F-G+F+G+F+G-F-G-F+G+F-G-F-G-F+G+F-G-F-G+F+G+F+G-F-G+F+G+F-G-F-G-F+G+F+G-F-G+F+G+F+G-F-G+F+G+F-G-F-G-F+G+F+G-F-G+F+G+F+G-F-G-F+G+F-G-F-G-F+G+F-G-F-G+F+G+F+G-F-G-F+G+F-G-F-G-F+G+F+G-F-G+F+G+F+G-F-G+F+G+F-G-F-G-F+G+F-G-F-G+F+G+F+G-F-G-F+G+F-G-F-G-F+G+F-G-F-G+F+G+F+G-F-G-F+G+F-G-F-G-F+G+F+G-F-G+F+G+F+G-F-G+F+G+F-G-F-G-F+G+F-G-F-G+F+G+F+G-F-G-F+G+F-G-F-G-F+G+F-G-F-G+F+G+F+G-F-G+F+G+F-G-F-G-F+G+F+G-F-G+F+G+F+G-F-G+F+G+F-G-F-G-F+G+F+G-F-G+F+G+F+G-F-G-F+G+F-G-F-G-F+G+F-G-F-G+F+G+F+G-F-G
So great, you now have a very long line of text but it doesn’t seem very useful…
Well imagine a tiny little turtle, this turtle is dragging a pen behind himself and everywhere he walks he leaves a line. He is also a very well trained little turtle and he can follow commands to walk forward or turn left or turn right.
So looking at our string again let’s define that F and G means “go forward 80 steps” and - means “turn left 60 degrees” and + means “turn right 60 degrees”. Then lets turn our generated strings into a list of commands for our wee friend, the turtle.
With 2 iterations (and a result of F+G+F-G-F-G-F+G+F) our turtle will draw the following:
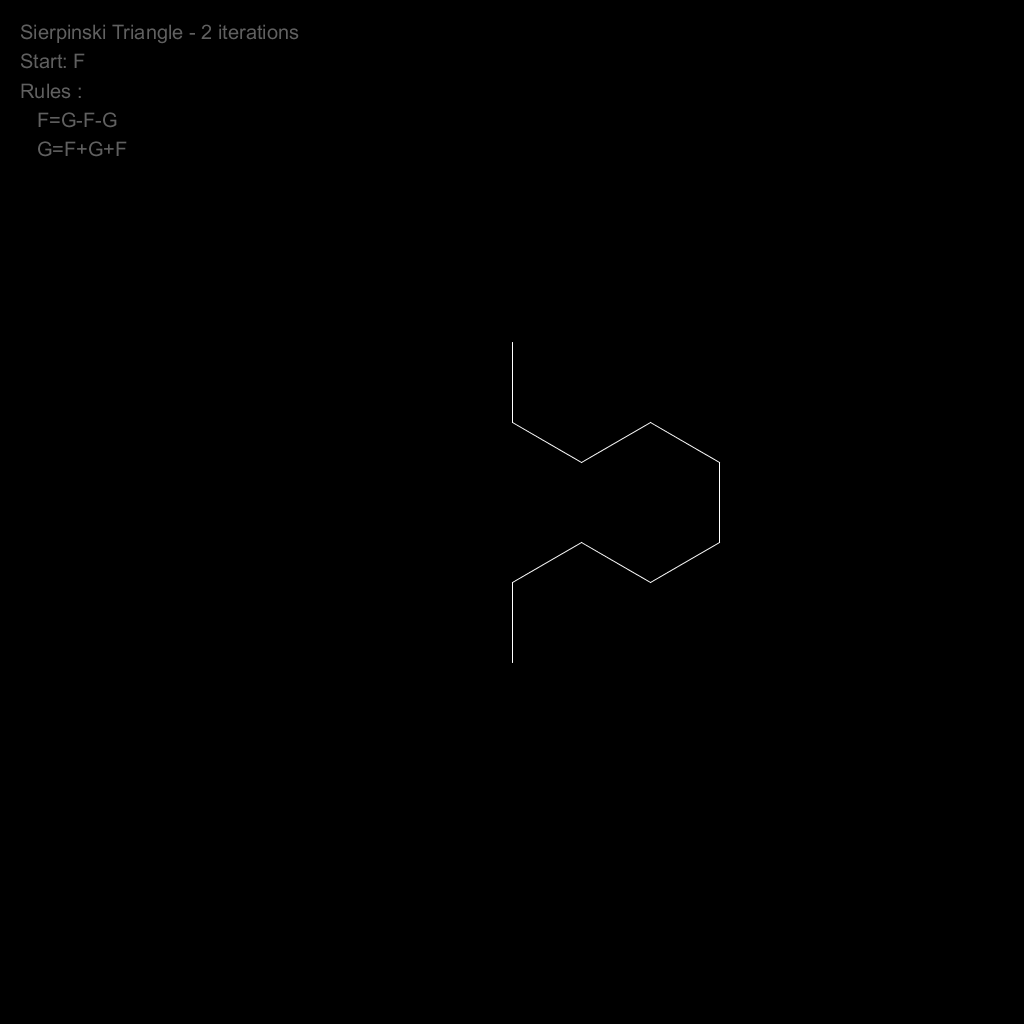
If we keep incrementing our iterations, our turtle will draw:
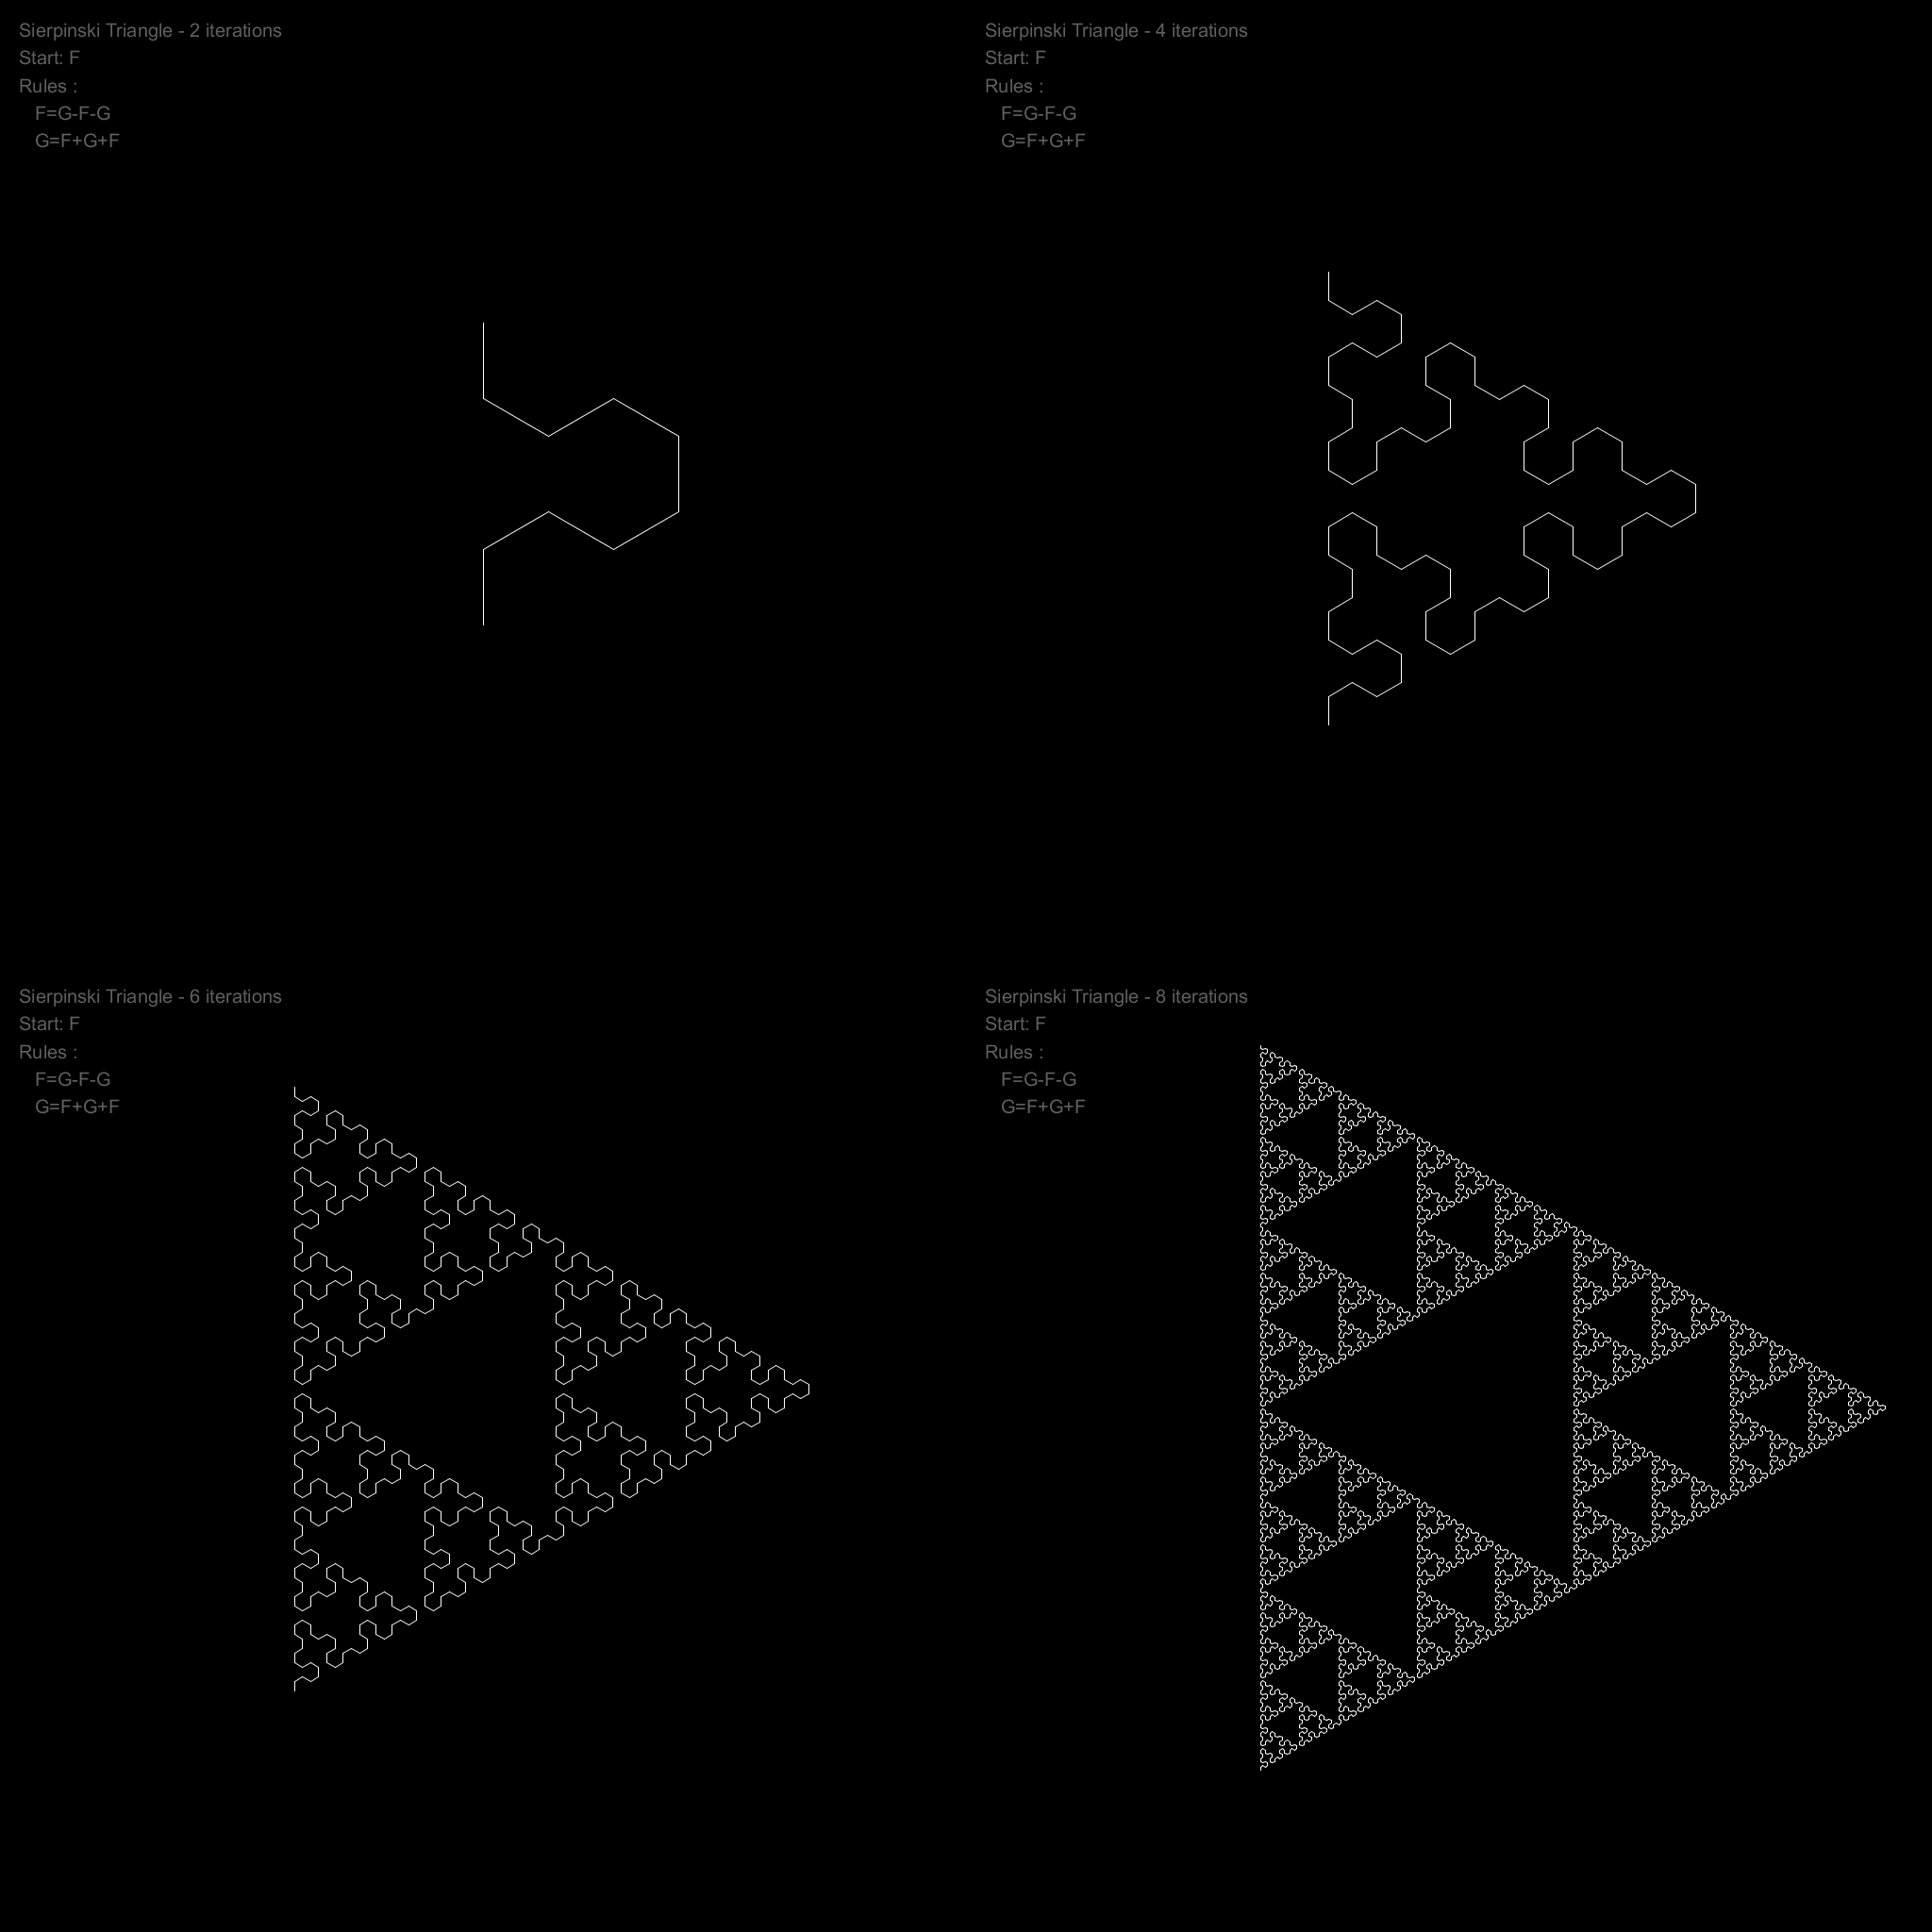
With 8 iterations we end up with quite a cool pattern (known as a Sierpinski Triangle). It could be used as a nice (but predictable) maze for a game or perhaps an interesting texture.
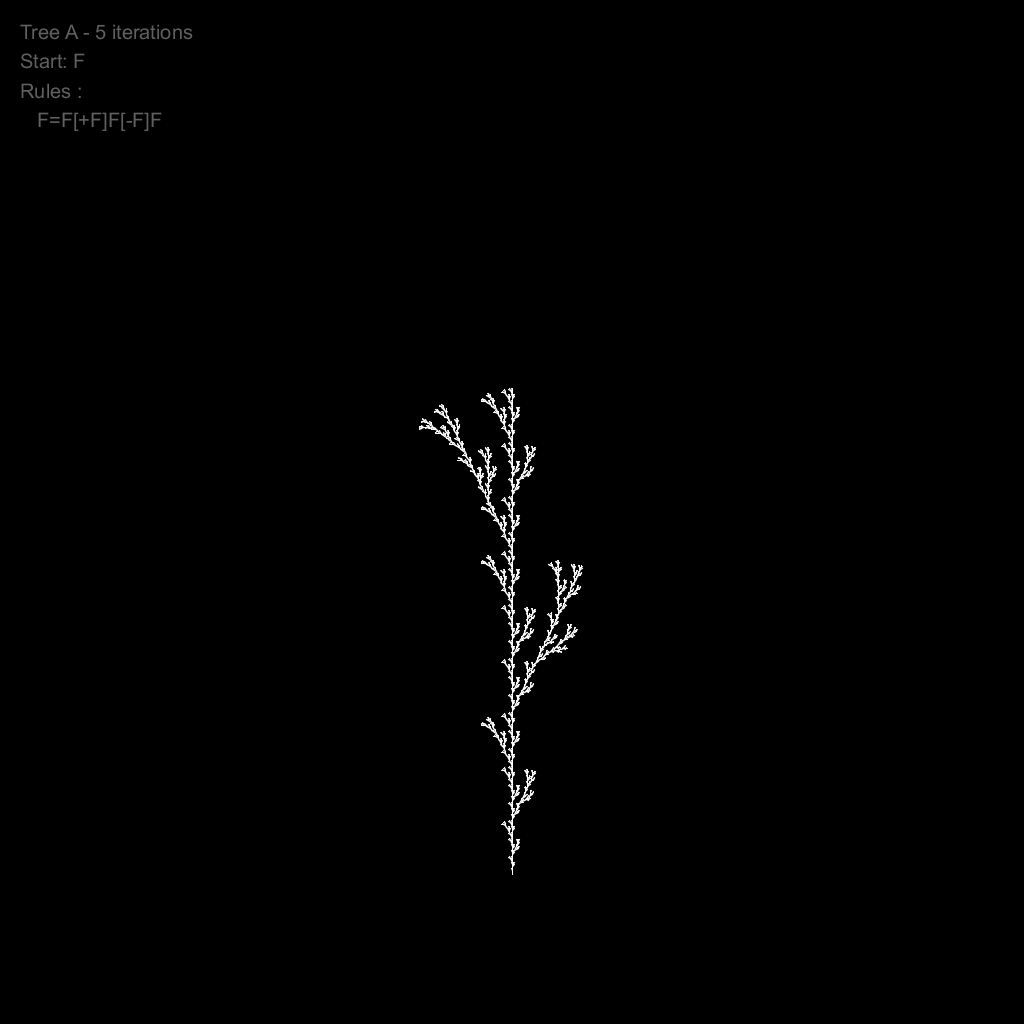
Let’s teach our turtle some new tricks. Firstly we will teach him to remember his current location and which direction he facing. Next we will teach him to teleport from his current position back to a previous one that he has remembered. We’ll tie these to the [ and ] characters in our L-system strings.
These new commands let us create branching structures, perfect for generating organic things like plants.
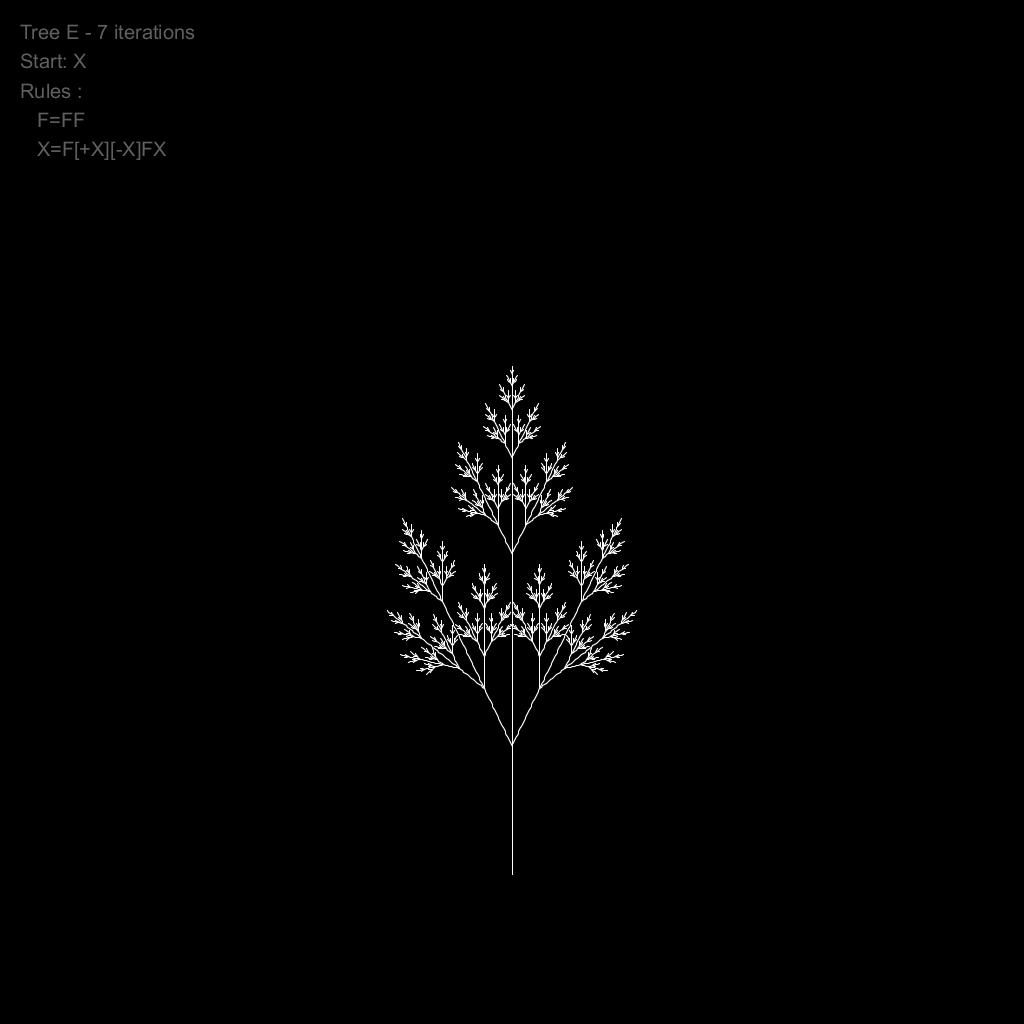
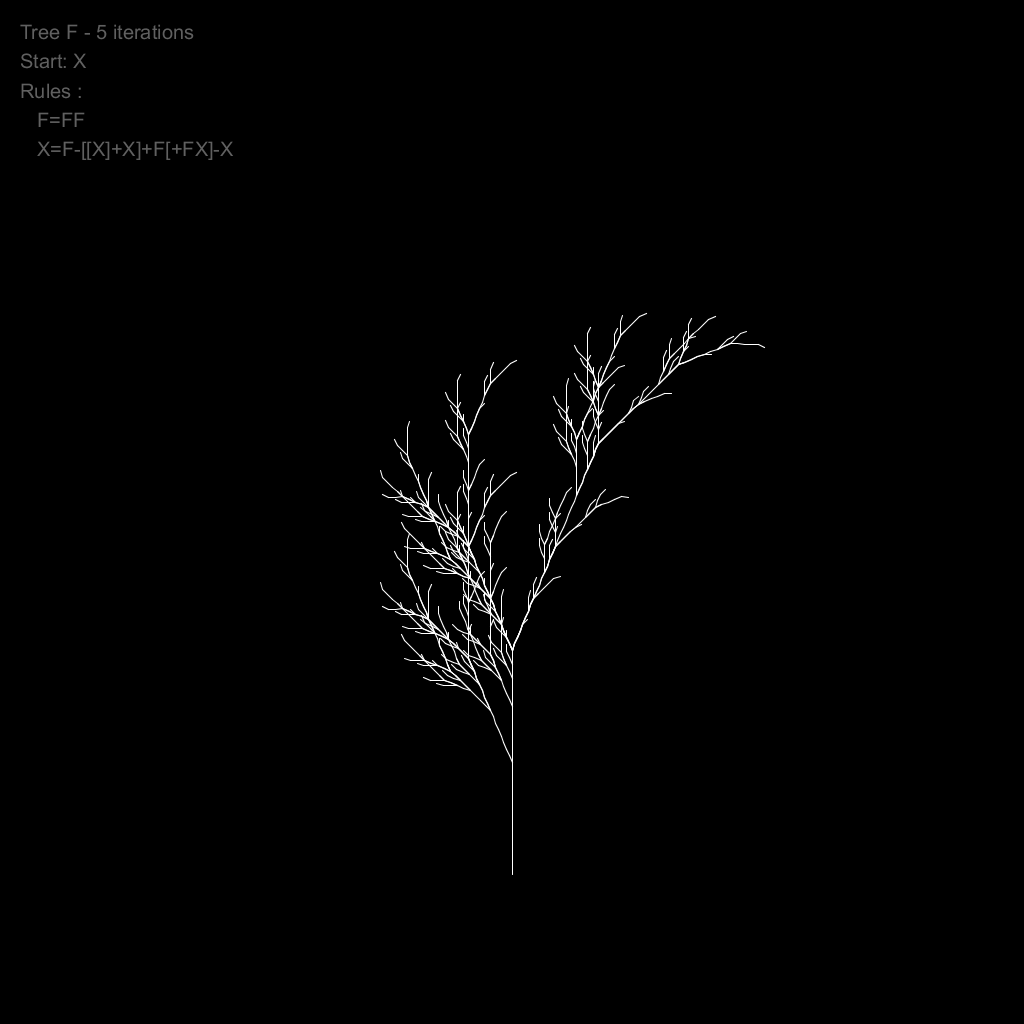
For example with a very simple L-system like this:
We get this neat plant:

With these very simple types of rules we can generate a swag of different plants:
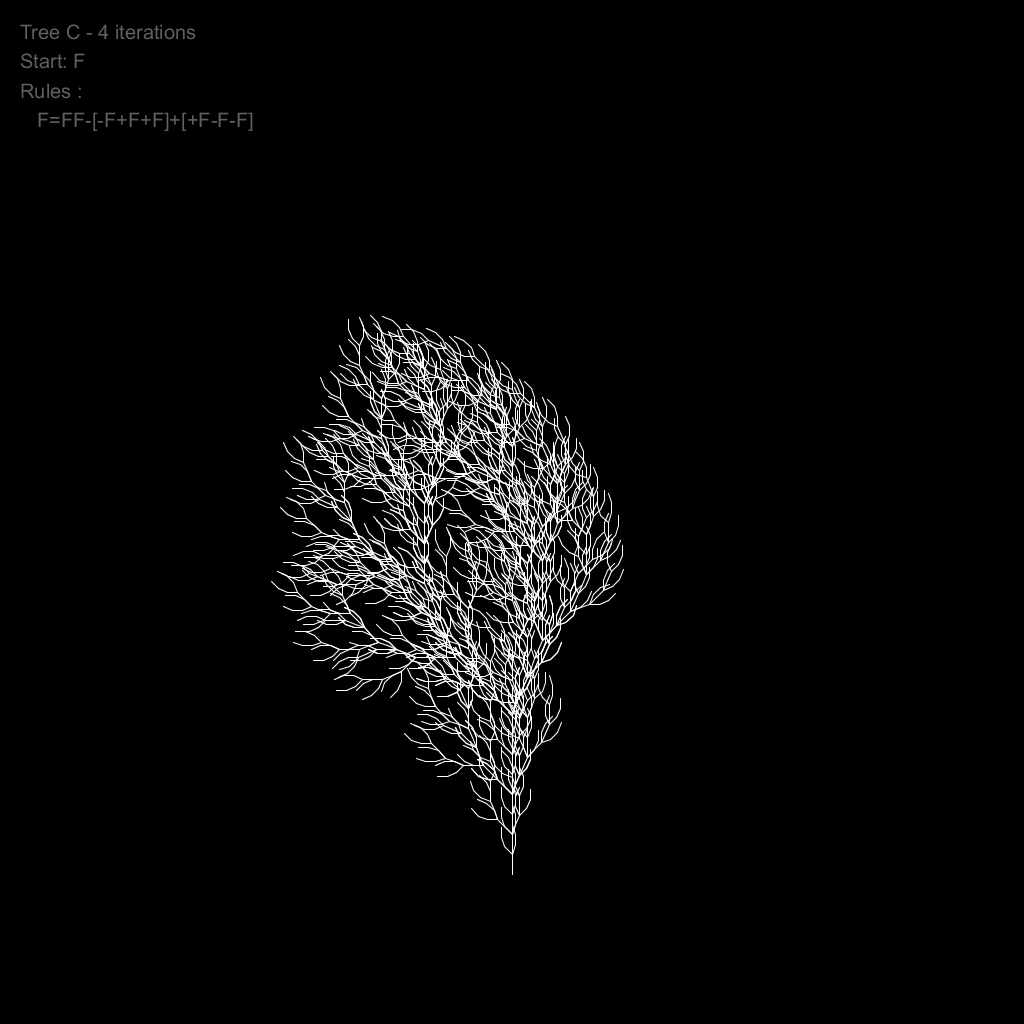

One of the nice things about procedural content generation is that a small tweak to the input parameters can result in big changes in the output. The following animation shows the same L-system but with varying iterations, angles and step lengths.
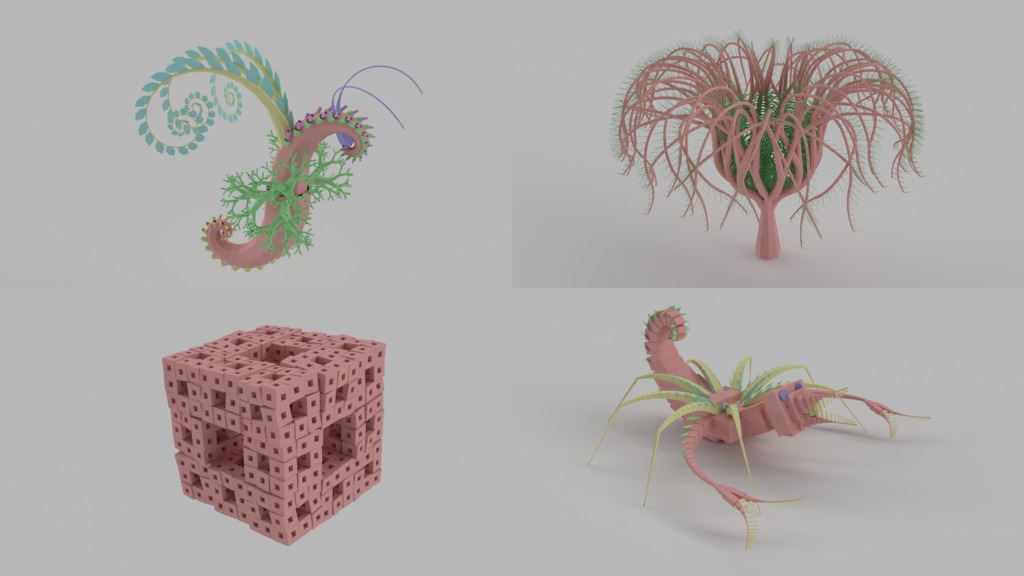
Lastly, our turtle doesn’t necessarily need to only draw only lines or operate in 2 dimensions. Laurens Lapre created a great tool in the early 90’s called LPARSER which generated 3D models using L-systems. Below are a couple of these models rendered in Blender. As you can see in the “spider” and “air horse” examples, organic creatures can also be generated using L-systems. Laurens’ tool also has a mutate function that mutates the generated system to great effect.
Phewww, well that was longer then I expected! If you’d like to find out more about L-systems then check out The Algorithmic Beauty of Plants by P. Prusinkiewicz and A. Lindenmayer. Also all the code (mostly Processing) used to generate the images above can be found here.
If you enjoyed this post then check out my other posts on procedural content generation.
Last Friday I got to do live radio for the first time! Since I didn’t come across as a complete idiot I thought I’d share the clip with everyone. The subject was hacking and the clip was recorded during the breakfast show on Radio Hauraki.
Unfortunately I miss-heard the question about the Whaleoil hack and landing up talking about the likely attack vector for The Fappening (the August 2014 celebrity photo leaks)… the perils of live radio I guess :)
BTW the tool I was referring to was called ibrute and it took advantage of an issue with Apple’s find my phone service which, did not lock out accounts if successive incorrect passwords were entered. The application simply tries a bunch of common passwords for a list of email addresses you give it and reports back on the ones that worked.
The passwords that the tool uses where the 500 most common ones used by users of the RockYou website that was hacked (the details of around 32 million accounts were stolen). If your password is on this list you should really go and change it right now! And of course never, ever use the same password on different sites. Here is a handy way to come up with unique but easy to remember passwords.
Years ago I was given a shiny, silver Robosapien. It’s an awesome humanoid robot controlled and programmed with an infrared remote. Unfortunately with 90+ commands and functions the remote is pretty cumbersome. So I always intended to see if I could put something together to control him from a PC, but I never got around to doing it.

My 5 year old is in his first year of school and since he now has some basic reading skills I thought I’d try to introduce him to programming. Initially I tried out Scratch and whilst he loved playing with the outputs the UI was too abstract and complex for him to grok. However he is enamored with robots, gears, motors and inventions, so I figured that controlling something physical with a simple set of commands would work better for him.
And so Project Frankensapien was born.
First off I decided that I didn’t want to do anything invasive to the Robosapien (now know as Frank). This means that my interface to him would need to be via IR, emulating his remote control. Secondly I want to be able to control him from a PC to shorten the development and testing/hacking cycle. Additionally I’d like to play with some computer vision stuff and I figured that I’d go RoboCup styles, using the processing grunt of the PC as the brains of the robot and broadcasting simple instructions to the robot to carry out.
Lastly I’d like to try make Frank autonomous by strapping a Raspberry Pi to him!
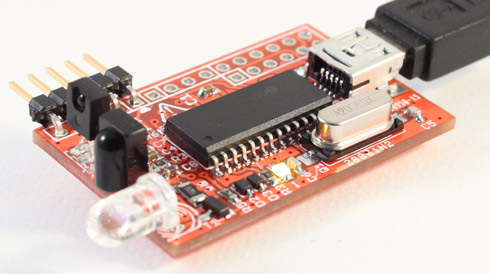
With this in mind I purchased an USB Infrared Toy v2. Its USB interface means it can be plugged into my PC and into the Raspberry Pi. The device is also both an IR receiver and transmitter which means I can use it to record, analyse and emulate the IR command sequences sent by Frank’s remote.
The first step in the project was to be able to send Frank’s commands via the USB Infrared Toy. To do this I settled on trying to get WinLIRC up and running. This software is a Windows port of LIRC and provides tools to capture and execute IR commands. Better yet it has direct support for the USB Infrared Toy and its config files are compatible with LIRC so I should be able to use the same configuration files on the Raspberry Pi.
Installation of the USB Infrared Toy was pretty straight forward, I just followed the instructions detailed on the dangerousprototypes website. Next I downloaded WinLIRC and a LIRC configuration for the Robosapien I found on the web (I had to retrieve the file from the Wayback Machine as it had fallen off the Internet).
I fired WinLIRC up and… nada. It did not like the configuration at all :( Additionally the COM port for the USB Infrared Toy (yes, you talk to the USB Infrared Toy via a serial over USB connection) kept disappearing on me. Things were not looking good at all.
After digging around on the web I found that I could use the IRGraph to get a visualization of what the USB Infrared Toy is receiving. This generated a graph looking like this:

and showed that the toy was able to read the IR commands sent by Frank’s remote.
Next up I tried to use the IRRecord tool to record commands from Frank’s remote and then generate a LIRC config file. The tool seemed to have real issues dealing with the Robosapien remote and the config file that it generated did no work. It did however generate a good config for my Samsung TV remote.
Looking at the software for the USB Infrared Toy, I discovered a tool called irtoy that records and plays back IR commands. So I thought I’d give this a try. Unfortunately it required a firmware update and when I tried the update it got stuck in bootloader mode and I could not access the USB Infrared Toy! After some cursing and switching of USB ports (and waiting), windows finally found the toy (which turns into a USB human interface device in bootloader mode) and I was able to complete the firmware upgrade. Phew!
The irtoy tool recorded and played back a command so further confirmed that the USB Infrared Toy could be used to communicate with Frank. So (slightly in frustration) I bought a copy of AnalysIR which apparently supported LIRC export and the USB Infrared Toy.
Whilst I waited for the license key for AnalysIR, I figured I’d try to roll a config by hand. Using info gleaned from the following links:
I put together a config file that only handled the STOP command, fired it up and got Frank to… fart! (the OOPS command). Which was pretty funny but also slightly indicative of my feelings towards my efforts so far.
Comparing the bitmasks of the STOP and OOPS commands, I didn’t see much correlation. I figure I just got lucky and managed to send some junk that Frank managed to understand.
0x8E - 10001110 - STOP
0xC7 - 11000111 - OOPS (Fart)
However I did get something useful out another of WinLIRC’s tool, RawCodes, when pressing the STOP button on Frank’s remote:
SPACE 16777215
PULSE 6741
SPACE 3605
PULSE 789
SPACE 917
PULSE 853
SPACE 917
PULSE 831
SPACE 938
PULSE 831
SPACE 3605
PULSE 789
SPACE 3626
PULSE 789
SPACE 3647
PULSE 789
SPACE 895
PULSE 853
Mapping the long spaces to 1’s and the short ones to 0’s I was able to figure out that:
So I coded up the following config file and gave it a whirl:
begin remote

  name      Robosapienv1

  frequency 39200
  header    6666 3550
  bits      7
  eps       30
  aeps      100
  one       833 3333
  zero      833 833
  foot      833 16777215

    begin codes
        STOP 0x8E
    end codes

end remote
Success! Next I used the data on the RoboSapien IR Codes page to get the rest of the commands and added them to the file:
# WinLirc/Lirc config to control V1 Robosapien
#
# Testing with WinLirc and USB Infared Toy V2
#
# from http://www.markcra.com/robot/ir_codes.php
# and http://lirc.10951.n7.nabble.com/robosapien-config-td272.html
# and http://daverobertson63.wordpress.com/2013/05/05/updated-robosapien-ir-control-arduino/

begin remote

	name      Robosapienv1

	frequency 39200
	header    6666 3550
	bits      7
	eps       30
	aeps      100
	one       833 3333
	zero      833 833
	foot      833 833

	begin codes

# movement commands (no shift)
        TURN_RIGHT 0x80
        RIGHT_ARM_UP 0x81
        RIGHT_ARM_OUT 0x82
        TILT_BODY_RIGHT 0x83
        RIGHT_ARM_DOWN 0x84
        RIGHT_ARM_IN 0x85
        WALK_FORWARD 0x86
        WALK_BACKWARD 0x87
        TURN_LEFT 0x88
        LEFT_ARM_UP 0x89
        LEFT_ARM_OUT 0x8A
        TILT_BODY_LEFT 0x8B
        LEFT_ARM_DOWN 0x8C
        LEFT_ARM_IN 0x8D
        STOP 0x8E

# Programming commands (no shift)
        MASTER_COMMAND_PROGRAM 0x90
        PROGRAM_PLAY 0x91
        RIGHT_SENSOR_PROGRAM 0x92
        LEFT_SENSOR_PROGRAM 0x93
        SONIC_SENSOR_PROGRAM 0x94

# Green shift commands
        RIGHT_TURN_STEP 0xA0
        RIGHT_HAND_THUMB 0xA1
        RIGHT_HAND_THROW 0xA2
        SLEEP 0xA3
        RIGHT_HAND_PICKUP 0xA4
        LEAN_BACKWARD 0xA5
        FORWARD_STEP 0xA6
        BACKWARD_STEP 0xA7
        LEFT_TURN_STEP 0xA8
        LEFT_HAND_THUMP 0xA9
        LEFT_HAND_THROW 0xAA
        LISTEN 0xAB
        LEFT_HAND_PICKUP 0xAC
        LEAN_FORWARD 0xAD
        RESET 0xAE
        EXECUTE_MASTER_COMMAND_PROGRAM 0xB0
        WAKEUP 0xB1
        EXECUTE_RIGHT_SENSOR_PROGRAM 0xB2
        EXECUTE_LEFT_SENSOR_PROGRAM 0xB3
        EXECUTE_SONIC_SENSOR_PROGRAM 0xB4

# Orange shift commands
        RIGHT_HAND_STRIKE_3 0xC0
        RIGHT_HAND_SWEEP 0xC1
        BURP 0xC2
        RIGHT_HAND_STRIKE_2 0xC3
        HIGH_5 0xC4
        RIGHT_HAND_STRIKE_1 0xC5
        BULLDOZER 0xC6
        OOPS_FART 0xC7
        LEFT_HAND_STRIKE_3 0xC8
        LEFT_HAND_SWEEP 0xC9
        WHISTLE 0xCA
        LEFT_HAND_STRIKE_2 0xCB
        TALKBACK 0xCC
        LEFT_HAND_STRIKE_1 0xCD
        ROAR 0xCE
        ALL_DEMO 0xD0
        POWER_OFF 0xD1
        DEMO_1_KARATE 0xD2
        DEMO_2_RUDE 0xD3
        DANCE 0xD4

	end codes

end remote
Using the Transmit tool that comes with WinLirc I can now send Frank commands using the the USB Infrared Toy, for example:
Transmit Robosapienv1 HIGH_5
Transmit Robosapienv1 BURP
Transmit Robosapienv1 TURN_RIGHT
My favorite to date is the “pull my finger” script which programs Frank’s right touch sensor to OOPS when touched:
Transmit Robosapienv1 RIGHT_SENSOR_PROGRAM
Transmit Robosapienv1 OOPS_FART
Transmit Robosapienv1 PROGRAM_PLAY
Next up I plan to cobble together a simple web interface so that Frank can be controlled via a browser. Unfortunately the USB Infrared Toy’s range seems a bit limited (about 50cm max) so I may have to accelerate the plan to strap the Raspberry Pi to Frank so that I can keep the IR emitter permanently near his head. I also want to have a good play with AnalysIR tool, whose license turned up just as I succeeded in hand coding the LIRC config.

It looked a lot bigger to the naked eye…