Right-sizing User Stories

I was asked by a customer to give a talk about right-sizing user stories. Below is the summary I gave them. This is by no means an original bit of thinking but ideas pulled from a number of sources (1, 2), however it made a nice little summary so I thought I’d post it.

Form

A User Story typically takes the form of:

As <type of user>
I want <some goal>
So that <some reason>

So what is the right size ?

There is no right answer !

It pretty much depends on the team. In particular their skill levels, the process they follow and their domain knowledge. All these factors impact the size of a User Story that is right for the team.

A well oiled team, working in a domain they know inside and out can consume and deliver much larger User Stories with ease. A newbie team with little domain knowledge is going to require much finer sized (and easier to consume) User Stories.

Rules of thumb

However, there some rules of thumb that can help you find the right size of User Story for your team:

  • small enough to be understood by the team and be implemented by the team in a short space of time
  • big enough to represent business value in its own right
  • big enough to deliver on its own

A User Story is NOT…

  • A task (e.g. a small bit of work that has no standalone business value)
  • A requirement

Instead a User Story:

  • Groups a set of tasks to be done (which can be used for bottom up estimation if need be)
  • Groups a set of requirements (ideally defined as acceptance criteria)

A User Story is “Done” when:

  • All the tasks have been completed
  • All the acceptance criteria have been met

Some examples

“As a user, I want a new system because the old one no longer meets my needs” is too big (probably even too big as an Epic)

“As a user, I want to register, login and manage my details online” is still too big. It should be at least three User Stories, covering logging in, registering and managing details.

For most teams even three would be too coarse. Logging in could itself be broken down into three finer grained User Stories:

  • “As a user, I want to log in, so that I can access my private information”
  • “As a user, I want to reset my forgotten password, so that I can login”
  • “As a user, I want the system to remember me, so that I don’t have to log in every time”

These are probably the size of User Story I’d suggest that most teams use. Each delivers a standalone bit of business value, can be easily understood & implemented and can be easily prioritized in a back log.

If you start to create features like “As a user, I want to enter my user ID” and “As a user, I want to push the login button”, then stop, you have gone too far !
F is for Feature Driven Development

Feature Driven Development (FDD) is my favorite Agile methodology. I have been using it for a number of years and it works really, really well. Here is a quick intro to FDD that I wrote a while back.

An introduction to Feature Driven Development

Feature Driven Development (FDD) is an Agile software development methodology. It provides a simple 5 step process that focuses on the delivery of quality software aligned with business needs.

FDD has a strong focus on efficient, up-front scoping, planning and costing, which makes it easy to slot into enterprise project governance structures.

The 5 Processes

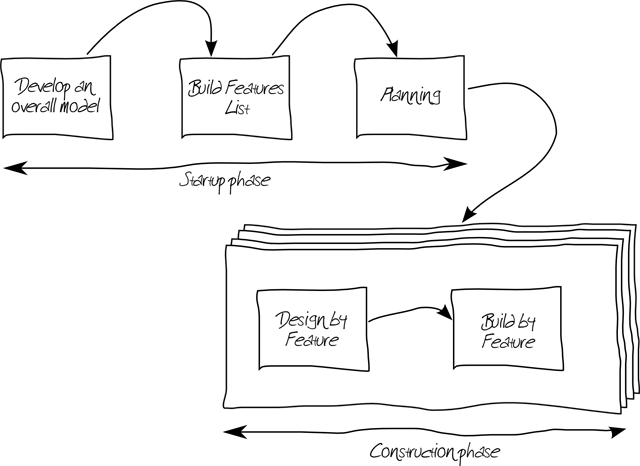
The five FDD processes are grouped into two phases; the “start up” phase and the ”construction” phase. The focus of the start up phase is around scoping and planning,

whilst the construction phase is focused on the iterative and incremental build of the solution.

By the end of the start up phase, a highly accurate business case can be created (if required by an organisation’s governance structures).

FDD Proceses

Process 1 – Develop an overall model

During this process the scope and the architecture of the solution are developed. This process generally takes the form of a number of half-day workshops involving all parties (stakeholders, architects, project managers, testers, developers, domain experts etc.). Outputs are typically story boards, deployment diagrams, use-case models etc.

Process 2 – Build Features list

During this process the solution is broken down into a list of features. A Feature is a part of

the solution’s functionality expressed in client or stakeholder terms. For instance:

  • Calculate the total amount of a Sale
  • Calculate the total quantity sold by a Retail Outlet for an Item Description
  • Determine the most recent Cash Register Assignment for a Cashier

This list is prioritized based on business needs, technical dependencies and risk. This process is typically completed in a workshop with all the participants of from process 1 and usually only takes a couple of hours.

Process 3 – Planning

In this process the features are grouped together into “Work Packages” and a project plan is built around the delivery of these work packages.

A work package is designed to be 2 weeks long, with the team deciding on how many features can be fitted into each work package. The end result of this process is a firm project plan for the delivery of the prioritised feature list. Costings for the project can then be easily derived from this plan.

Process 4 – Design by Feature

During this process the team perform the detailed analysis, design and design QA for the features in the current work package. As with all Agile methods this work is done with heavy involvement of the stakeholders and domain experts. Once completed the development of the Feature can start.

Process 5 – Build by Feature

This process is focused on the delivery of unit tested code into a build of the solution, ready for testing by stakeholders, testers and other interested parties. This allows for early integration, testing and feedback which is crucial for a modern software development project’s success.

Rinse and Repeat

After a work package is completed, the project plan is reviewed and work begins on the next work package. This allows the solution delivery to adapt to changing business requirements and needs.

Tracking in FDD

Tracking is a key aspect of FDD. All tracking is performed against features. During the Design by Feature and Build by Feature processes, a number of milestone dates are tracked. This provides early warning of any potential issues. For example:

Feature Tracking

As each milestone is met a percentage complete is calculated for the feature, missed milestones are highlighted in red on progress charts.

Additionally, velocity charts are used to validate that the project is on track. Typically a feature completed by week (actual vs. planned) chart is used for this:

Velocity Tracking

Finally a “parking lot” diagram is used to summarise the overall state of the project:

Parking Lot

Scaling FDD

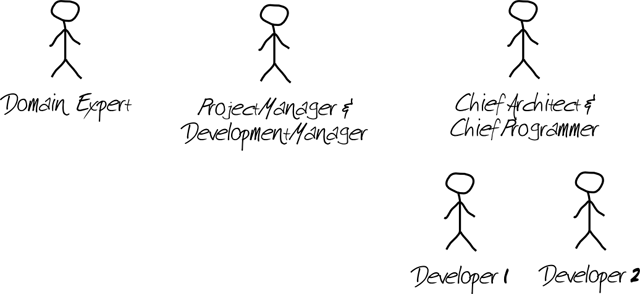
FDD is easily scalable to various team sizes, for example a small sized project team might look like this:

Small project

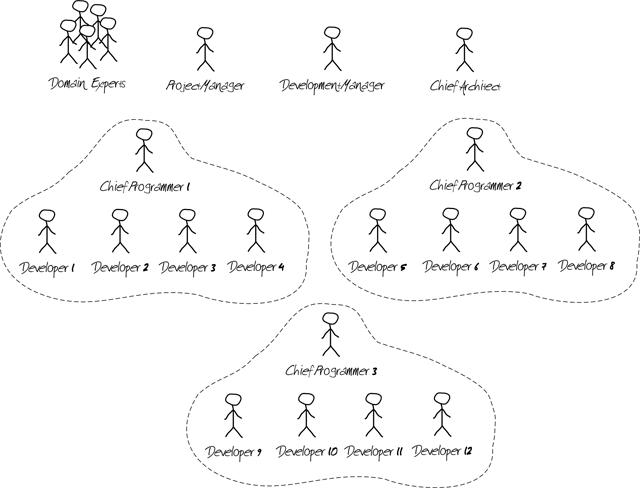
Whilst a large project team may look like this:

Large project

With 3 coding teams working on different features in parallel.

Summary

Agile methods are a great way to effectively build software and FDD is an easy to follow and implement example of an Agile method.

Review: Balsamiq Mockups

Ok let me start off by saying “I love this application”. It does exactly what it says on the box, it’s fast, easy to use and the results are impressive.

So what is it? Well it’s an application that lets you create mock-ups for websites, desktop apps and even iPhone apps.

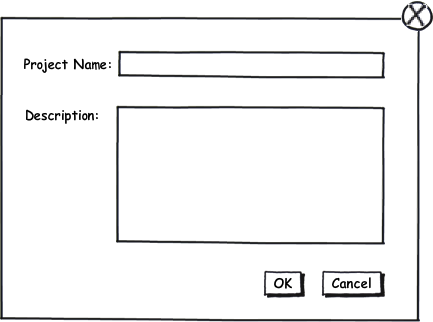
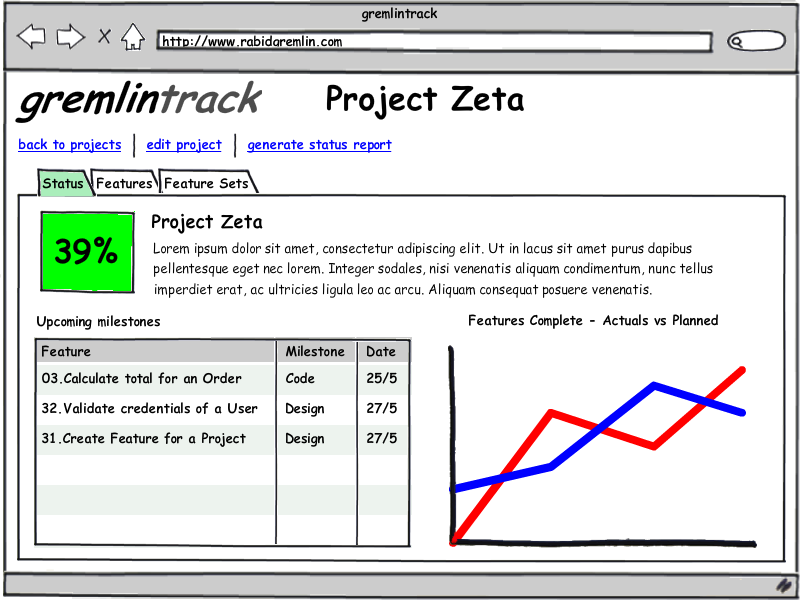
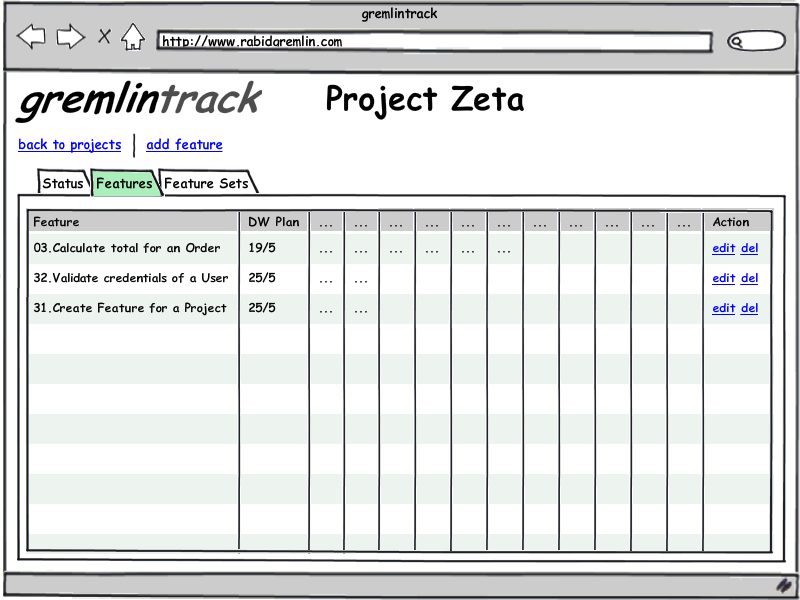
For instance here are some mock-ups for the FDD tracking app that I’m working on. It took less then 20 minutes to put these together.

One of the best things about the tool is the “UI controls”. For instance if you drop a grid object on to your page and click on it, you get a text area into which you can type comma separated values. Each line of text becomes a row in the grid and each value becomes a cell. If you type [] you get a checkbox, [x] gives you a checked checkbox, [text] gives you a hyperlink of the word text. It couldn’t be easier.

Check out this video to see it action:

YouTube Preview Image

and some more examples.

Balsamiq Mockups is an Adobe Air application so it automatically updates when a new release is available. It also means that it runs on multiple platforms, I have seen it running on Windows and Mac os without issue.

Each screen that is created is stored in a separate XML based file. Most of the UI controls can be set to link to another screen, this along with the full screen mode, allows you to easily walk people through your mock-ups on screen.

You can also export your mock-ups as .png files. Unfortunately it does not export to PDF which would be nice.

The desktop version of the tool is $79 which gives you updates for life, which is not a bad deal at all. There are also versions for JIRA, Confluence and XWiki.

My only gripes are that sometimes it is tricky to select objects when they are layered on top of one another. Also there is no way to build your own smart UI controls although you can draw just about any GUI control using the supplied primitive objects.

If need to do any kind of mock-ups then I cannot reccommend this tool enough. Download an evalution copy and try it for yourself. You won’t be disappointed.

Its all about clarity

Over the last 15 odd years I have been involved with dozens of IT projects of all shapes, sizes. Recently I have been reflecting on why some of these projects were a dream and delivered successfully, whilst others were a complete nightmare and went horribly wrong.

An obvious factor is the size of the project but that does not ring true. I have been involved with huge projects that went like clockwork and small projects that just couldn’t seem to get off the ground. The same is true for projects with complex or simple domains; projects with untried technologies or projects with proven technologies.

So what was the differentiator?

After much pondering I have come to the conclusion that those projects that were most successful had a good deal of clarity. Clarity in what needed to be done, why it needed to be done and how it was going to be done.

So I’ve come up with a new catchphrase (which I intend to bandy about at every opportunity):

“CLARITY leads to FOCUS, FOCUS leads to DELIVERY”

Actually I really wanted to use VELOCITY in there somewhere and DELIVERY is just so so unsexy so perhaps its still a work in progress but I digress.

So what do I mean by clarity ? Well pretty much exactly what it’s definition says “The state of being clear in thought”.

Of course this isn’t a new concept, which is why we have the waterfall process with its BDUF (big design up front) approach. Unfortunately this process actually has the opposite effect because it tends to silo the project members around particular phases and then uses big fat documents as a means of communication between these silos. At each step of the way clarity around the why, what and how is typically eroded or even (as I have seen in some cases) corrupted, all of which leads to the classic customer reaction ,when they see their software for the first time, of “What the hell is that, thats not what I wanted”.

This of course is where agile processes come into play with their sleek processes that allow a project to deliver efficiently and successfully. Of course without clarity an agile project degenerates into a mess, with quality going out the window in an effort to meet iteration deadlines, constant quick fixes, a stressed out team and a failed project.

So how do you about gaining clarity?

The best approach I have seen is to get as many of the people who are going to be involved with the project into a room to work out the why, what and how. The group should include the stakeholders, end-users, subject matter experts, architects, UI designers, testers, business analysts, developers, project managers, infrastructure bods. Pretty much anyone who can add value to the process.

Don’t panic, even for large systems the effort involved for this is measured in hours and days, not weeks and months. I would however, suggest you find a good facilitator to keep what is typically a fairly large group of people focused.

Here are some techniques that I have used or seen used to nail down the why, what and how:

To capture the why, write a vision statement. It doesn’t have to be book. In fact put a limited on the length of the statement such as “25 words” or “3 sentences” or if you want to be particularly nasty: “7 words”.

To capture the what, you can uses any number of techniques. I find that visual ones work best (and are easily done on a whiteboard) so use-case diagrams, storyboards or UI wireframes and entity or domain models are the order of the day.

In a similar vein, to capture the how, nothing beats a deployment model and some sequence or activity diagrams (all in UML of course).

So to make your IT project a success make sure you have clarity and remember

“CLARITY leads to FOCUS, FOCUS leads to DELIVERY” :)

Check out Scott Ambler’s Agile Modelling site which covers some of the techniques above and has a bunch of other practical and interesting ideas.