F is for Feature Driven Development

Feature Driven Development (FDD) is my favorite Agile methodology. I have been using it for a number of years and it works really, really well. Here is a quick intro to FDD that I wrote a while back.

An introduction to Feature Driven Development

Feature Driven Development (FDD) is an Agile software development methodology. It provides a simple 5 step process that focuses on the delivery of quality software aligned with business needs.

FDD has a strong focus on efficient, up-front scoping, planning and costing, which makes it easy to slot into enterprise project governance structures.

The 5 Processes

The five FDD processes are grouped into two phases; the “start up” phase and the ”construction” phase. The focus of the start up phase is around scoping and planning,

whilst the construction phase is focused on the iterative and incremental build of the solution.

By the end of the start up phase, a highly accurate business case can be created (if required by an organisation’s governance structures).

FDD Proceses

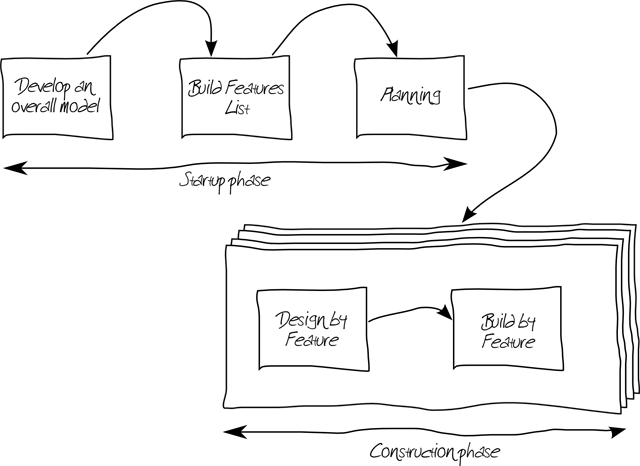
Process 1 – Develop an overall model

During this process the scope and the architecture of the solution are developed. This process generally takes the form of a number of half-day workshops involving all parties (stakeholders, architects, project managers, testers, developers, domain experts etc.). Outputs are typically story boards, deployment diagrams, use-case models etc.

Process 2 – Build Features list

During this process the solution is broken down into a list of features. A Feature is a part of

the solution’s functionality expressed in client or stakeholder terms. For instance:

  • Calculate the total amount of a Sale
  • Calculate the total quantity sold by a Retail Outlet for an Item Description
  • Determine the most recent Cash Register Assignment for a Cashier

This list is prioritized based on business needs, technical dependencies and risk. This process is typically completed in a workshop with all the participants of from process 1 and usually only takes a couple of hours.

Process 3 – Planning

In this process the features are grouped together into “Work Packages” and a project plan is built around the delivery of these work packages.

A work package is designed to be 2 weeks long, with the team deciding on how many features can be fitted into each work package. The end result of this process is a firm project plan for the delivery of the prioritised feature list. Costings for the project can then be easily derived from this plan.

Process 4 – Design by Feature

During this process the team perform the detailed analysis, design and design QA for the features in the current work package. As with all Agile methods this work is done with heavy involvement of the stakeholders and domain experts. Once completed the development of the Feature can start.

Process 5 – Build by Feature

This process is focused on the delivery of unit tested code into a build of the solution, ready for testing by stakeholders, testers and other interested parties. This allows for early integration, testing and feedback which is crucial for a modern software development project’s success.

Rinse and Repeat

After a work package is completed, the project plan is reviewed and work begins on the next work package. This allows the solution delivery to adapt to changing business requirements and needs.

Tracking in FDD

Tracking is a key aspect of FDD. All tracking is performed against features. During the Design by Feature and Build by Feature processes, a number of milestone dates are tracked. This provides early warning of any potential issues. For example:

Feature Tracking

As each milestone is met a percentage complete is calculated for the feature, missed milestones are highlighted in red on progress charts.

Additionally, velocity charts are used to validate that the project is on track. Typically a feature completed by week (actual vs. planned) chart is used for this:

Velocity Tracking

Finally a “parking lot” diagram is used to summarise the overall state of the project:
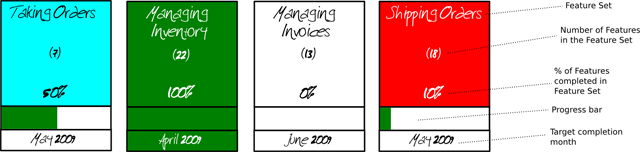
Parking Lot

Scaling FDD

FDD is easily scalable to various team sizes, for example a small sized project team might look like this:

Small project

Whilst a large project team may look like this:

Large project

With 3 coding teams working on different features in parallel.

Summary

Agile methods are a great way to effectively build software and FDD is an easy to follow and implement example of an Agile method.

E is for Elastic band contraption

My eldest (currently 5) is big on “making” inventions” and experiments. Last weekend he desperately wanted to invent something with engines. Not having any engines handy I figured we could perhaps do something with elastic bands. Googling didn’t turn up anything too exciting but I did come across a picture of something from my childhood: a cotton reel with and elastic band threaded through the middle of the reel and held in place with a matchstick which you then wind to make a wind up toy:

Source http://www.minieco.co.uk/cotton-reel-tanks/

Source http://www.minieco.co.uk/cotton-reel-tanks/

Unfortunately I didn’t have a cotton reel (nor suitable elastic bands it turns out) but after raiding the recycling bin and craft supplies I managed to collect:

  • Some cardboard toilet rolls
  • A pizza box lid
  • Some elastic bands
  • Some popsicle sticks
  • Some small matchstick sized bits of wood

First off I got the boys (child number 2 now joining in) to trace out 4 circles on the pizza box lid, using an upside down glass as a template.

These we then cut out as wheels, punching a hole in the middle of each one.

We then threaded an elastic band through the wheel, down the cardboard toilet roll and through the other wheel. On one end we hooked the elastic band over the matchstick sized bit of wood and the other end went over the tip of the popsicle stick.

All set we wound up the elastic band (using the popsicle stick) and calamity! The elastic bands we had were too weak and snapped when wound up :(

A quick raid of the bathroom secured us a couple of hair ties as replacements for the elastic bands. Unfortunately these were too strong, when wound up nothing moved… so off to the garage where we found a couple of metal washers to insert between the wheel and popsicle stick and…. success!

After some experimentation we discovered that its best to not wind the contraption too much, otherwise it just goes into a crazy spin! However if you wind it up about 7 times it travels in a nice straight line.

We taped the wheels to the cardboard tube with some sticky tape and the boys then decorated their vehicles with paint and pens. Then it was off to the driveway to hold some races ☺

Here is a video clip of the vehicle in action:

YouTube Preview Image

D is for DNS

Alright, I thought I’d do a quick blog on the DNS or the Domain Name Service? Why? Well because without it the Internet as we know it would not work and subversion of the DNS system is how Turkey recently blocked access to Twitter, Facebook and YouTube so it’s very topical!

First off you need to know that every computer connected to the Internet has a unique numeric address, kinda like a phone number.  For example the server that Google runs on (at least one of them) has an address of 74.125.237.114. If you type that into your browser’s address bar you will see the Google search page!

Now, in the real world, it’s very hard to remember more then a few phone numbers, so we use phonebooks, like the white and yellow pages, to make it easy to look up a phone number. This is basically what the DNS is, the phonebook of the Internet. When you type in www.google.com into your browser, your computer uses the DNS to figure out that the address of the computer you want to connect with is 74.125.237.114 !

This fun video explains things in more detail:

YouTube Preview Image

So how did Turkey block Twitter, Facebook and YouTube? Well, initially they forced the Turkish ISPs to change their DNS servers to provide the “wrong” address for the Twitter, Facebook and Youtube’s servers. This meant that a person connected to the Internet in Turkey who tried to access these sites saw some kind of government site instead.

People quickly clicked as to what was happening and spread the word to configure their computers to not use their ISP’s DNS servers but to instead use Google’s servers (at 8.8.8.8). In fact this information started to appear as graffiti on walls and posters in Istanbul:

Source http://mashable.com/2014/03/21/twitter-ban-turkey-graffiti/

Source http://mashable.com/2014/03/21/twitter-ban-turkey-graffiti/

This worked for a while until the Government got wise and forced the ISPs to block traffic to 8.8.8.8 and 8.8.4.4, effectively cutting off access to the Google DNS servers.

Still as John Gilmore famously said: “The Net interprets censorship as damage and routes around it” and by using virtual private networks (VPNs) and censorship resistant networks such as Tor the people of Turkey were still able to connect to Twitter, Facebook and Youtube to air their views about their government.

Viva la Internet!

C is for Code

I believe that everyone should be able to program a computer! Now I can see you all rolling your eyes but bear with me for a moment.

We live in the Information Age, computers are everywhere and computer literacy is a skill everyone needs. Unfortunately most people stop short, learning to drive a computer but not really learning to use its full potential.

Now don’t get me wrong, I’m not advocating that everyone become professional programmers. We are strange bunch and you really have to love puzzles and think in a particular way to do coding as job, but the number of times I have seen people perform mindless, error prone, tasks on a computer which could be automated by a simple computer program is astounding. For instance re-sizing hundreds of photos or writing 100 personalized letters, one… at… a… time…

Work smarter not harder is the name of the game!

So what is this “code” stuff anyway ? Well, computers are pretty simple devices, powered by electricity everything comes down to whether something is turned on or off. Programming (or coding) is the process of writing out a set of instructions that you want the computer to perform and then en_coding_ them in to a form that the computer can understand.

In early days of computers this meant that a computer program (a group of instructions) would look like this:

10110100 00001001 10111010 00001000
00000001 11001101 00100001 11000011
01001000 01100101 01101100 01101111
00100001 00001101 00100100

Some poor engineer would need to figure out all these 1’s and 0’s (ons and offs) and then enter them into a computer by either toggling switches or feeding it paper tape with holes punched into it. By the way those 1’s and 0’s above display the text  Hello! on the screen when execute by a computer!.

Clearly this wasn’t productive at all. So the concept of an “assembler” was developed. This would allow a program to be written in a human friendlier way which, could then be assembled into the 1’s and 0’s that the computer could understand. So now you could write the following to print Hello! on the screen, instead of coding up a bunch of 1’s and 0’s:

start:
        mov     ah,9
        mov     dx,hello
        int     21h
        ret

hello   db      'Hello!',13,36

This is much better…not! At least it vaguely looks like English but its still not really easy to understand. Luckily 3rd generation “languages” were developed which, meant that programs could be written in English (with a very strict grammar) and then “compiled” into the 1’s and 0’s needed by the computer. Our program to display Hello! on the screen now just becomes:

print "Hello!"

Much simpler!

A crash course in how programs work

A computer program contains 4 different things:

Statements – Instructions to do something. For example the print statement we saw above or

1+1

Which adds 1 and 1. These can be combined, so the following prints out 2 on the screen:

print 1+1

Loops – Instructions to do something a number of times. For example to display the numbers 1 to 10 on the screen:

for count in range(1,11):
    print count

Conditionals – Instructions to do something, if something is true. For example:

if 1+1 == 2:
    print "The answer is 2!"

Variables – Places to store things (data) needed by the program. For example

answer = 1+1
print answer
answer = answer + 40
print answer

Which:

  1. Adds 1 and 1 and stores the result (2) into a variable called answer
  2. Displays the value of answer on the screen (2)
  3. Takes the value of answer, adds 40 to it and then stores the result (42) back into the variable called answer
  4. Finally displays the value of answer again on the screen (42)

Tada! You’re programming

Its remarkably easy and with a little bit of study, you can save yourself hours of time or even write yourself that smartphone app you have also wanted. If you are interested in learning more about programming, the Internet is chock full of resources. I’d suggest you check out the Codecademy or The Khan Academy sites to get started. The examples above were written using a language named Python (named after the Monty Pythons) which is particularly easy to learn, but it is only one of many different computer languages.

Oh yes and those tedious tasks I mentioned at the start of this post, here is how you would solve them in Python:

# Python program that resizes all the .jpg images in a folder named "photos"

# load some "modules" that tell the computer how to manipulate files and images
import glob
from PIL import Image

# we want to resize images to 640 by 480 pixels
size = (640,480)

# grab a list of the .jpg files in the photos folder
photos_to_resize = glob.glob('photos/*.jpg')
print "Resizing: " + str(photos_to_resize)

# resize each photo in the folder and save the resized photo
for photo in photos_to_resize:
    resized_photo = photo[:-4] + "_resized.jpg" # create name for the resized photo
    im = Image.open(photo) # open the photo
    im.thumbnail(size, Image.ANTIALIAS) # resize the photo
    im.save(resized_photo, "JPEG") # save the photo
    print photo + " resized and saved as " + resized_photo

and

# Python program that generates a personalised letter for a list of people
# it generates a word document with one letter per page

# load a "module" to tell the computer how to create word documents
from docx import Document

# the list of people that we want to create letters for
names = [
'Emma',
'Charlotte',
'Ella',
'Sophie',
'Hannah',
'Emily',
'Jessica',
'Olivia',
'Grace',
'Isabella'
]

# create a new word document
document = Document()

# for each name in the list create a letter
for name in names:
    document.add_paragraph( "Dear %s," % name) # add the salutation

    # add the rest of the text
    document.add_paragraph( "Thanks for your interest in the Acme 2001 Widget. We are pleased to announce that these are now available for sale.")
    document.add_paragraph( "As a valued customer you can purchase one with a 25% discount!")
    document.add_paragraph( "Yours Sincerely")
    document.add_paragraph( "Horace P Sweet")

    # add a page break so we get one letter per page
    document.add_page_break()

# save the word document
document.save('Letters.docx')

B is for Blender

I have tinkered with 3D graphics for years, using POV-Ray in the mid nineties and later Hash Animation:Master. However these tools were pretty limited or not widely supported and commercial tools costed (and still do) a small fortune which put them out of reach of hobbyists.

Blender Logo

So I was very excited when Blender was released in 2002 . With its commercial features and it being free (open source) the scene was set for great things to happen.

Unfortunately Blender’s origin as an in-house product for a visual FX studio meant that it was hard to use, with a confusing user interface and buggy features.

However Blender is a show case of how open source software works. A community quickly formed, new features were rapidly added and a new improved (and consistent) user interface was developed.

Today Blender is an easy to use, powerful application. In fact it has several releases a year, outdoing most commercial applications in the speed at which it evolves and improves.

So what can Blender do? Well pretty much anything you need to produce 3D animation and special effects. It supports 3D modelling, animation, physics, rendering, video editing and compositing. It even has a game engine and is widely used by hobbyist and indie developers to create assets for their games.

One interesting aspect of Blender are the blender movie projects. Every couple of years the Blender Foundation raises funds and tackles the production of a movie. As they do this, they fine tune and enhance the product based on real world experience. All the assets of the movies are also released to community. There have been 4 movies to date and the 5th one is in the works.

YouTube Preview Image YouTube Preview Image YouTube Preview Image

There are also a number of other “open” movie projects. For instance Caminandes:

YouTube Preview Image

If you want to give Blender a go I ‘d suggest you start with the very well paced tutorials by BornCG, for inspiration you cannot go wrong with the excellent tutorials of Andrew Price over at Blender Guru and finally, here is a tutorial on creating some cute Minions:

YouTube Preview Image

Happy Blending!

A is for Apathy

I started this blog way back in 2001, the 2nd of October 2001 to be exact (according to the Way Back Machine)

However in the last year or so I’ve been very slack at posting anything (other then my automated tweet logs).

This is a shame because my blog does get a fair bit of traffic (about 5000 unique visitors a month) and contains popular posts such as my Creating your first Unity Android App post which averages about 150 views a day.

So today I have decided to take the Blogging from A to Z Challenge which is to write a blog post each day in April themed to each letter of the alphabet.

Hopefully this will kick my apathetic blogging butt into gear!