D is for DNS

Alright, I thought I’d do a quick blog on the DNS or the Domain Name Service? Why? Well because without it the Internet as we know it would not work and subversion of the DNS system is how Turkey recently blocked access to Twitter, Facebook and YouTube so it’s very topical!

First off you need to know that every computer connected to the Internet has a unique numeric address, kinda like a phone number.  For example the server that Google runs on (at least one of them) has an address of 74.125.237.114. If you type that into your browser’s address bar you will see the Google search page!

Now, in the real world, it’s very hard to remember more then a few phone numbers, so we use phonebooks, like the white and yellow pages, to make it easy to look up a phone number. This is basically what the DNS is, the phonebook of the Internet. When you type in www.google.com into your browser, your computer uses the DNS to figure out that the address of the computer you want to connect with is 74.125.237.114 !

This fun video explains things in more detail:

YouTube Preview Image

So how did Turkey block Twitter, Facebook and YouTube? Well, initially they forced the Turkish ISPs to change their DNS servers to provide the “wrong” address for the Twitter, Facebook and Youtube’s servers. This meant that a person connected to the Internet in Turkey who tried to access these sites saw some kind of government site instead.

People quickly clicked as to what was happening and spread the word to configure their computers to not use their ISP’s DNS servers but to instead use Google’s servers (at 8.8.8.8). In fact this information started to appear as graffiti on walls and posters in Istanbul:

Source http://mashable.com/2014/03/21/twitter-ban-turkey-graffiti/

Source http://mashable.com/2014/03/21/twitter-ban-turkey-graffiti/

This worked for a while until the Government got wise and forced the ISPs to block traffic to 8.8.8.8 and 8.8.4.4, effectively cutting off access to the Google DNS servers.

Still as John Gilmore famously said: “The Net interprets censorship as damage and routes around it” and by using virtual private networks (VPNs) and censorship resistant networks such as Tor the people of Turkey were still able to connect to Twitter, Facebook and Youtube to air their views about their government.

Viva la Internet!

C is for Code

I believe that everyone should be able to program a computer! Now I can see you all rolling your eyes but bear with me for a moment.

We live in the Information Age, computers are everywhere and computer literacy is a skill everyone needs. Unfortunately most people stop short, learning to drive a computer but not really learning to use its full potential.

Now don’t get me wrong, I’m not advocating that everyone become professional programmers. We are strange bunch and you really have to love puzzles and think in a particular way to do coding as job, but the number of times I have seen people perform mindless, error prone, tasks on a computer which could be automated by a simple computer program is astounding. For instance re-sizing hundreds of photos or writing 100 personalized letters, one… at… a… time…

Work smarter not harder is the name of the game!

So what is this “code” stuff anyway ? Well, computers are pretty simple devices, powered by electricity everything comes down to whether something is turned on or off. Programming (or coding) is the process of writing out a set of instructions that you want the computer to perform and then en_coding_ them in to a form that the computer can understand.

In early days of computers this meant that a computer program (a group of instructions) would look like this:

10110100 00001001 10111010 00001000
00000001 11001101 00100001 11000011
01001000 01100101 01101100 01101111
00100001 00001101 00100100

Some poor engineer would need to figure out all these 1’s and 0’s (ons and offs) and then enter them into a computer by either toggling switches or feeding it paper tape with holes punched into it. By the way those 1’s and 0’s above display the text  Hello! on the screen when execute by a computer!.

Clearly this wasn’t productive at all. So the concept of an “assembler” was developed. This would allow a program to be written in a human friendlier way which, could then be assembled into the 1’s and 0’s that the computer could understand. So now you could write the following to print Hello! on the screen, instead of coding up a bunch of 1’s and 0’s:

start:
        mov     ah,9
        mov     dx,hello
        int     21h
        ret

hello   db      'Hello!',13,36

This is much better…not! At least it vaguely looks like English but its still not really easy to understand. Luckily 3rd generation “languages” were developed which, meant that programs could be written in English (with a very strict grammar) and then “compiled” into the 1’s and 0’s needed by the computer. Our program to display Hello! on the screen now just becomes:

print "Hello!"

Much simpler!

A crash course in how programs work

A computer program contains 4 different things:

Statements – Instructions to do something. For example the print statement we saw above or

1+1

Which adds 1 and 1. These can be combined, so the following prints out 2 on the screen:

print 1+1

Loops – Instructions to do something a number of times. For example to display the numbers 1 to 10 on the screen:

for count in range(1,11):
    print count

Conditionals – Instructions to do something, if something is true. For example:

if 1+1 == 2:
    print "The answer is 2!"

Variables – Places to store things (data) needed by the program. For example

answer = 1+1
print answer
answer = answer + 40
print answer

Which:

  1. Adds 1 and 1 and stores the result (2) into a variable called answer
  2. Displays the value of answer on the screen (2)
  3. Takes the value of answer, adds 40 to it and then stores the result (42) back into the variable called answer
  4. Finally displays the value of answer again on the screen (42)

Tada! You’re programming

Its remarkably easy and with a little bit of study, you can save yourself hours of time or even write yourself that smartphone app you have also wanted. If you are interested in learning more about programming, the Internet is chock full of resources. I’d suggest you check out the Codecademy or The Khan Academy sites to get started. The examples above were written using a language named Python (named after the Monty Pythons) which is particularly easy to learn, but it is only one of many different computer languages.

Oh yes and those tedious tasks I mentioned at the start of this post, here is how you would solve them in Python:

# Python program that resizes all the .jpg images in a folder named "photos"

# load some "modules" that tell the computer how to manipulate files and images
import glob
from PIL import Image

# we want to resize images to 640 by 480 pixels
size = (640,480)

# grab a list of the .jpg files in the photos folder
photos_to_resize = glob.glob('photos/*.jpg')
print "Resizing: " + str(photos_to_resize)

# resize each photo in the folder and save the resized photo
for photo in photos_to_resize:
    resized_photo = photo[:-4] + "_resized.jpg" # create name for the resized photo
    im = Image.open(photo) # open the photo
    im.thumbnail(size, Image.ANTIALIAS) # resize the photo
    im.save(resized_photo, "JPEG") # save the photo
    print photo + " resized and saved as " + resized_photo

and

# Python program that generates a personalised letter for a list of people
# it generates a word document with one letter per page

# load a "module" to tell the computer how to create word documents
from docx import Document

# the list of people that we want to create letters for
names = [
'Emma',
'Charlotte',
'Ella',
'Sophie',
'Hannah',
'Emily',
'Jessica',
'Olivia',
'Grace',
'Isabella'
]

# create a new word document
document = Document()

# for each name in the list create a letter
for name in names:
    document.add_paragraph( "Dear %s," % name) # add the salutation

    # add the rest of the text
    document.add_paragraph( "Thanks for your interest in the Acme 2001 Widget. We are pleased to announce that these are now available for sale.")
    document.add_paragraph( "As a valued customer you can purchase one with a 25% discount!")
    document.add_paragraph( "Yours Sincerely")
    document.add_paragraph( "Horace P Sweet")

    # add a page break so we get one letter per page
    document.add_page_break()

# save the word document
document.save('Letters.docx')

B is for Blender

I have tinkered with 3D graphics for years, using POV-Ray in the mid nineties and later Hash Animation:Master. However these tools were pretty limited or not widely supported and commercial tools costed (and still do) a small fortune which put them out of reach of hobbyists.

Blender Logo

So I was very excited when Blender was released in 2002 . With its commercial features and it being free (open source) the scene was set for great things to happen.

Unfortunately Blender’s origin as an in-house product for a visual FX studio meant that it was hard to use, with a confusing user interface and buggy features.

However Blender is a show case of how open source software works. A community quickly formed, new features were rapidly added and a new improved (and consistent) user interface was developed.

Today Blender is an easy to use, powerful application. In fact it has several releases a year, outdoing most commercial applications in the speed at which it evolves and improves.

So what can Blender do? Well pretty much anything you need to produce 3D animation and special effects. It supports 3D modelling, animation, physics, rendering, video editing and compositing. It even has a game engine and is widely used by hobbyist and indie developers to create assets for their games.

One interesting aspect of Blender are the blender movie projects. Every couple of years the Blender Foundation raises funds and tackles the production of a movie. As they do this, they fine tune and enhance the product based on real world experience. All the assets of the movies are also released to community. There have been 4 movies to date and the 5th one is in the works.

YouTube Preview Image YouTube Preview Image YouTube Preview Image

There are also a number of other “open” movie projects. For instance Caminandes:

YouTube Preview Image

If you want to give Blender a go I ‘d suggest you start with the very well paced tutorials by BornCG, for inspiration you cannot go wrong with the excellent tutorials of Andrew Price over at Blender Guru and finally, here is a tutorial on creating some cute Minions:

YouTube Preview Image

Happy Blending!

A is for Apathy

I started this blog way back in 2001, the 2nd of October 2001 to be exact (according to the Way Back Machine)

However in the last year or so I’ve been very slack at posting anything (other then my automated tweet logs).

This is a shame because my blog does get a fair bit of traffic (about 5000 unique visitors a month) and contains popular posts such as my Creating your first Unity Android App post which averages about 150 views a day.

So today I have decided to take the Blogging from A to Z Challenge which is to write a blog post each day in April themed to each letter of the alphabet.

Hopefully this will kick my apathetic blogging butt into gear!

Tech Tip: Change AngularJS template delimiters

I have recently been doing some development with the Bottle Python web app framework. Unfortunately it’s simple template system uses the same template delimiters as Angular (“{{” and “}}”). Worse you cannot change these delimiters in Bottle.

Fortunately you can change them in Angular using the following:

var myApp = angular.module('talkpoint', [], function($interpolateProvider) {
    // set custom delimiters for angular templates
    $interpolateProvider.startSymbol('[[');
    $interpolateProvider.endSymbol(']]');
});

Which given a Controller looking like this:

myApp.controller('TodoCtrl', ['$scope', function($scope) {
    $scope.todos = [
        {text:'learn angular', done:true},
        {text:'build an angular app', done:false}];
}]);

Allows you to write Angular template code looking like this:

<div ng-controller="TodoCtrl" class="row">
  <ul >
    <li ng-repeat="todo in todos">
      <input type="checkbox" ng-model="todo.done">
      <span class="done-[[todo.done]]">[[todo.text]]</span>
    </li>
  </ul>
</div>

A is for Artemis

Artemis Logo
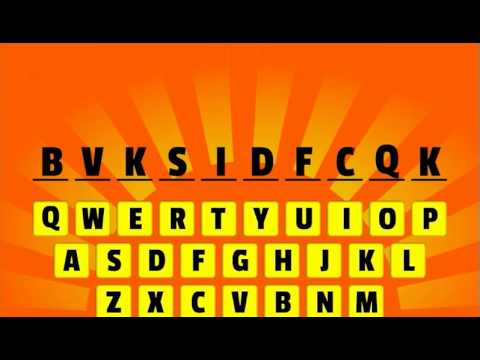
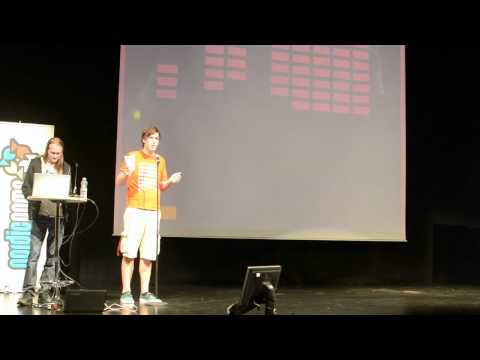
A few months ago, I had a group of friends over. Usually we just sit around and socialize, sometimes we play a board games or watch a movie but this time we did something different…. we played Artemis.

So what is Artemis? Well its a multi-player Starship Bridge Simulator where each player is assigned a different station (played on a PC or iPad) of a Starship Bridge. For instance there are helm, weapons, sensor, comms and engineering stations. One player is the Captain who gets to give the orders.

The aim of the game is to work together to complete Artemis’s mission.

Incredibly geeky I know and I wasn’t sure the group (especially the wives) would be into Atermis so after a couple of wines I floated the idea of trying out Artemis and showed them this video clip as an into…

YouTube Preview Image


Surprisingly everyone agreed to give it a go and so began the voyage of the plucky Artemis, her dysfunctional crew and their inept Captain.

Installation is pretty straight forward, after you purchase the software ($40 USD) you get an installer that run you on each of the player’s PCs (or laptops in our case). There is no licensing key and the developers rely on an honor system that you don’t share the installer outside of your 6 players. There are also a iPad and Android apps ($2.99 USD) that lets you use a tablet as a station.

One thing that you will need is one PC to act as the server. This PC also drives the view screen which lets the Captain see what is going on since they typically don’t have a PC (and as Captain you then get to yell out things like “Bring up Tactical on the view screen, Ensign Young”). My Dell Zino HTPC wired up to the living room 42-Inch LCD TV worked perfectly for this.

As a minimum you need three players to play: Captain, Helm and Weapons. Players can control more then one station but that often proves to be too tricky in the heat of battle. The game really shines when you have a full crew of 6 and all stations manned.

The game comes with a number of scripted missions but in its basic mode your mission is to just fend off waves of enemy ships that are trying to destroy you and your starbases. We have found that upping the difficultly level and setting the Sector setting to something other then “Barren” makes for quite an interesting game. You can also play in “Elite Co-Op” mode which lets a total of 6 ships (each with 6 players) play together which sounds like it would be awesome.

Over the last few months we have played with a number of different groups of people. I’ve been constantly surprised at how everyone gets drawn into the game (even the non Sci-Fi/geeky ones) and just how much fun it is. I would recommend that everyone give the game a go.

And just to set the record straight… the reason the Artemis was destroyed was that engineering did not fix the engines in time. It had nothing to do with the fact that I reversed the ship into the mine field we had just laid!

Update: Version 2.0 of Artemis was released last week and it features a ton of new features including:

  • Updated UI
  • Up to eight simultaneous bridges (48 players)
  • Full-fledged PVP mode, where any number of sides and teams can battle each other
  • Four new NPC non-combatant ships now ply the spacelanes, offering many new scenarios for Artemis crews.  These ships can be broken down, hijacked, blinded, held hostage, and more
  • Major AI and pathfinding improvements
  • Artemis ships play in real 3D now, with climb/dive controls (button, keyboard, and joystick).  Players can fly OVER a black hole, and come up underneath enemies

Word War III – Dev Diary – 05: The app meets real players

Oops it has been a while since I last posted but I have actually been working on the game!

As I mentioned in at the end of my last post, the plan was to get the game working end to end. First off I created a number of new classes most extending FContainer. LetterButton for each of the letter buttons that the player can tap, Letter for each of the letters of the word, Keyboard to hold and manage the letter buttons and Word to manage the word.

Creating these classes allows me to use the tweening library to animate buttons, words and letters appearing and disappearing. I also added handlers to these classes so that they can callback into the main game code when things happen such as a player tapping a button.

Here is a class diagram of the classes in the game:

Main classes

In the GameScreen’s Update() method I added some code to increment a time value every second of play. This method also holds a game over check which bounces the user to the game over screen if they exceed 120 seconds of time. For the moment I have also added a simple bar sprite that I resize to represent the time that has passed. I turn this into a more self contained class the future.

Here is the code for the Update() method:

override protected void Update()
{
      // inc the framecount
    framecount++;

      // has a second passed? Futile runs at 60fps
    if (framecount % 60 == 0)
    {
          // inc time and score
        time++;
        score+=5;

           // tween progress bar to new position
        Go.to(progBar,0.99f,new TweenConfig().floatProp("width",time*6.5f).setEaseType(EaseType.Linear));

           // has the player run out of time?
        if (time > 120)
        {
               // yep, stash their score and bounce them to game over screen
            Main.instance.lastScore = score;
            Main.instance.GoToScreen(ScreenType.GameOverScreen);

        }
    }
}

You will also notice the score increment that adds 5 points for every second that the player has survived.

The bulk of the game logic sits in the HandleLetterButtonRelease() method. This is called when a letter button is pressed by the Keyboard class:

private void HandleLetterButtonRelease(char theLetter)
{
      // was the letter in the word?
    if (word.PopLetter(theLetter))
    {
          // yep, give the user more time and play a good beep
        time -=1;
        FSoundManager.PlaySound("ok_beep");
    }
    else
    {
           // nope, penalise a wrong guess and play bad beep
        time+=2;
        FSoundManager.PlaySound("bad_beep");
    }

      // is the word complete?
    if (word.isComplete())
    {
          // give the player 10 more seconds of play time
        time-=10;

          // play word done sounds and give player 500 points
        FSoundManager.PlaySound("word_done");
        score+=500;

        // tween the word off the screen and then...
        Go.to(word, 0.2f, new TweenConfig ().
        setDelay(1.0f).
        floatProp("scaleY", 0.5f).      
        floatProp("alpha", 0f).
        setEaseType(EaseType.BackInOut).onComplete(c => {

               // remove the word from the stage
            word.RemoveFromContainer();

               // grab another word from the list of words
            wordPos += (int)RXRandom.Range(1,20);
            if (wordPos > Main.instance.words.Count)
            {
                wordPos = (int)RXRandom.Range(1,50);
            }

               // create a new Word and add it to the stage         
            word = new Word (Main.instance.words [wordPos]);
            word.y = 35;
            AddChild(word);

               // reset the keyboard showing any letters buttons that were hidden
            keyboard.Reset();           

        }));
    }

      // Pin the minimum time value to 1, award 1000 points if player manages to wind the clock this low
    if(time < 1)
    {
        time =1;
        score+=1000;
    }
}

I also dropped in some placeholder SFX and background track to round things off. Here is a clip of the final result:


YouTube Preview Image


Play testing

Proud of my work I handed the game over to Mrs Gremlin… she hated it! After a Q&A session it turns out that a) she doesn’t really like word games but more importantly b) the word list was awful.

Even though I had sanitized the list, she felt that the words were just too obscure. For instance “fashioned” was “not a real word”. So I went back to the drawing board and found a list of the 1000 most common words from texts in the Gutenberg Project. I quickly wrote some code to score each word (using the same algorithm I detailed here), sorted the list and dropped the list into the game.

This time Mrs G got into the game (particularly when she found out my top score was 7000ish which gave her a target to beat).

Since then I have shopped the game around my friends and acquaintances to get feedback. The highlights of this feedback are:

  • The game needs a non competitive (non time based mode) for those who want to just mindlessly guess words
  • The World War III theme did not gel with a lot of the girls. I need to think on this one
  • The score does definitely gives the game a competitive edge. At a party everyone was trying to beat everyone else’s scores. The couple of teaches in the group were whipping everyone’s butt whilst decrying some of the capabilities of our less learned friends
  • The progress bar was too easy to miss. I suspect this is because the progress bar doesn’t yet have the DEFCON milestones on it which should hopefully make things way more obvious.
  • Themed word lists
  • Background animations: bombs falling, lasers shooting them down. Planes flying passed etc.

So quite a bit to work on. Having said that no one thought the game was terrible and most played several games so I’m hopeful that I have something interesting here.

Word War III – Dev Diary – 04: Tween you and me

As this slightly over the top presentation shows adding motion, bounce and wiggle to your game elements can really make a game feel rich and alive:

YouTube Preview Image


Luckily this is easy to achieve with the GoKit tweening library that is included with Futile. The library allows you to easily change any property of an object over a specific period of time.

For instance this bit of code:

skyline.scaleY =0.1f;
Go.to(skyline, 0.75f, new TweenConfig ().     
      floatProp("scaleY", 1.0f).
      setEaseType(EaseType.BounceOut));

Sets the skyline sprite’s y scale to 0.1, it then uses the GoKit tweening library to scale the skyline sprite’s Y scale back to 1 over a period of 750ms with an ease of  BounceOut.

The effect of this is have the skyline spring out of the ground with a nice cartoony bounce. Adding some tweens to the title screen’s sprites like this:

private void AnimateIntro()
{
    bg.y = Futile.screen.height+70;
    bg.rotation = 10f;

    Go.to(bg, 0.5f, new TweenConfig ().
        setDelay(0.5f).
        floatProp("y", 0f).
        floatProp("rotation", 0f).
        setEaseType(EaseType.BounceOut));

    skyline.scaleY =0.1f;
    Go.to(skyline, 0.75f, new TweenConfig ().
        setDelay(1.0f).
        floatProp("scaleY", 1.0f).
        setEaseType(EaseType.BounceOut));

    title.scale = 0.001f;
    Go.to(title, 0.3f, new TweenConfig ().
        setDelay(1.5f).         
        floatProp("scale", 1.0f).
        setEaseType(EaseType.SineOut));

    nuke.scaleY = 0.001f;
    Go.to(nuke, 0.5f, new TweenConfig ().
        setDelay(2.3f).         
        floatProp("scaleY", 1.0f).
        setEaseType(EaseType.BounceOut));

    startButton.scaleY = 0.0f;

    Go.to(startButton, 0.5f, new TweenConfig ().
        setDelay(3.2f).
        floatProp("scaleY", 1.0f).
        setEaseType(EaseType.BounceOut));

    helpButton.scaleY = 0.0f;

    Go.to(helpButton, 0.5f, new TweenConfig ().
        setDelay(3.3f).
        floatProp("scaleY", 1.0f).
        setEaseType(EaseType.BounceOut));
}

Along with a tween to make the buttons disappear when we tap them on the game screen, gets us this:

YouTube Preview Image


So how exactly do these tweens work? Well it’s all down to some clever maths. The GoKit library implements what are known as the Robert Penner equations which are a set of equations that he published in a book called Programming Macromedia Flash MX. These equations can be used to produce organic feeling motions and change.

Basically these equations all take the form of a function that takes 4 parameters:

  • t – current time unit
  • b – the starting value
  • c – the total change of the value over the duration
  • d – the duration

The simplest of these doesn’t in fact result in any easing, it simply creates a linear motion:

public float EaseNone( float t, float b, float c, float d )
{
    return c * t / d + b;
}

Plotting this out on graph gives us this (with a starting point of 0, a change of 1, over 60 frames):

The bounce out equation is a bit more interesting:

public float EaseOut(float t, float b, float c, float d)
{
    if ((t /= d) < (1 / 2.75))
    {
      return c * (7.5625f * t * t) + b;
    }
    else if (t < (2 / 2.75))
    {
      return c * (7.5625f * (t -= (1.5f / 2.75f)) * t + .75f) + b;
    }
    else if (t < (2.5 / 2.75))
    {
      return c * (7.5625f * (t -= (2.25f / 2.75f)) * t + .9375f) + b;
    }
    else
    {
      return c * (7.5625f * (t -= (2.625f / 2.75f)) * t + .984375f) + b;
    }
}

Plotting this out looks like this:

Which is a much more interesting motion.

All in all there are 31 different eases in the library. This chart shows them all:

Next up I’m going to kick things up a notch and get the basic game play in place.

Word War III – Dev Diary – 03: Some Structure

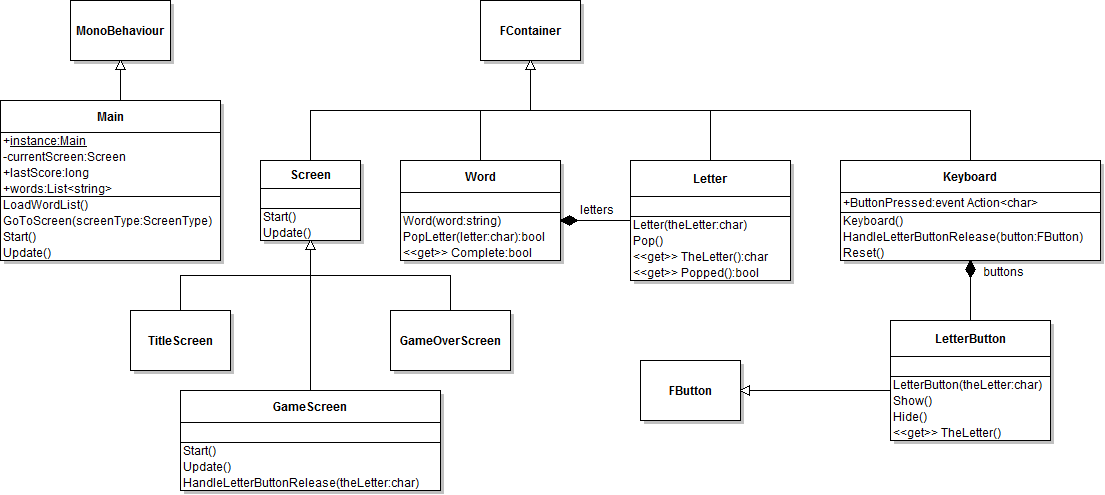
Next up is some “boring” housekeeping work on the code. Eventually the game will consist of four screens. If I keep up with my current approach of putting everything in a single script things will get pretty messy, pretty fast.

Luckily there is a better way which is highlighted in the Futile videos and in the Banana Demo project . The idea is to subclass the FContainer for each screen and then add and remove these objects from the Futile stage.

First off I create an enumeration defining each of the screens:

public enum ScreenType
{
    TitleScreen,
    GameScreen,
    ScoreScreen,
    HelpScreen
}

Then I created a base class which, extends FContainer, for my screens:

public abstract class Screen : FContainer
{       
    override public void HandleAddedToStage()
    {
        Futile.instance.SignalUpdate += Update;
        base.HandleAddedToStage();
    }

    override public void HandleRemovedFromStage()
    {
        Futile.instance.SignalUpdate -= Update;
        base.HandleRemovedFromStage();
    }

    public abstract ScreenType Type
    {
        get;
    }

    abstract public void Start();

    abstract protected void Update();
}

The Start() method will be called just after the screen object is created. This is where we will create all our FSprites etc for the screen. The Update() method is where we can stick any logic that needs to be updated every frame. I overrode HandleAddedToStage() and HandleRemovedFromStage() to clue Futile into the fact that it needs to call (or stop calling) the Update() method. Lastly I created the Type property so that the main script can figure out what type a screen is at run time.

Here is the (redacted) code for the TitleScreen:

public class TitleScreen : Screen
{
    private FButton startButton;
    private FSprite bg;
    private FSprite nuke;
    private FSprite skyline;
    private FSprite title;

    override public void Start()
    {
        bg = MakeSprite("Background.png", 0f, 0f);      
        AddChild(bg);               

        nuke = MakeSpriteWithBaseLine("nuke.png", 0f, -Futile.screen.halfHeight + 50);      
        AddChild(nuke);

        skyline = MakeSpriteWithBaseLine("skyline.png", 0f, -Futile.screen.halfHeight);     
        AddChild(skyline);      

        title = MakeSprite("Title.png", 0f, 180f);      
        AddChild(title);

        startButton = MakeButton(0f, 0f, "START");
        AddChild(startButton);      
        startButton.SignalRelease += HandleStartButtonRelease;
    }

    private FSprite MakeSprite(string name, float xPos, float yPos)
    {
        FSprite sprite = new FSprite (name);
        sprite.x = xPos;
        sprite.y = yPos;

        return sprite;
    }

    private FSprite MakeSpriteWithBaseLine(string name, float xPos, float yBaseline)
    {
        //...
    }

    private FButton MakeButton(float xPos, float yBaseline, string buttonText)
    {
        //...
    }

    public override ScreenType Type
    {
        get { return ScreenType.TitleScreen; }
    }

    override protected void Update()
    {
        // do nothing
    }

    private void HandleStartButtonRelease(FButton button)
    {
        Main.instance.GoToScreen(ScreenType.GameScreen);
    }
}

The MakeSprite(), MakeSpriteWithBaseLine() and MakeButton() methods are some helper methods to simplify the code. As you can see the Start() method is where all the components of the title screen are created. Since the title screen doesn’t have any frame based animation the Update() method is empty.

Lastly HandleStartButtonRelease() is set up as the method that is called when the start button is pressed. It calls the GoToScreen() method on the Main class to switch to the GameScreen. I’ll cover this in more detail below.

Main is a subclass of MonoBehaviour and is the script that is attached to the “Futile” object in the games’s scene. It looks something like this:

public class Main : MonoBehaviour
{
    public static Main instance;
    private Screen currentScreen = null;
    private FStage stage;

    // Initialise Futile and get the ball rolling
    void Start()
    {
        instance = this;

        FutileParams fparams = new FutileParams (true, true, false, false);

        //...

        Futile.instance.Init(fparams);

        //...

        stage = Futile.stage;       

        //...       

        // and lastly show the title screen
        GoToScreen(ScreenType.TitleScreen);
    }

    public void GoToScreen(ScreenType screenType)
    {
        if (currentScreen != null && currentScreen.Type == screenType)
        {
            return; //we're already on the same page, so don't bother doing anything
        }

        Screen screenToCreate = null;

        switch (screenType)
        {
            case ScreenType.TitleScreen:
                {
                    screenToCreate = new TitleScreen ();
                    break;
                }
            case ScreenType.GameScreen:
                {
                    screenToCreate = new GameScreen ();
                    break;
                }
        }

        if (screenToCreate != null)
        {
            //destroy the old page and create a new one
            if (currentScreen != null)
            {
                stage.RemoveChild(currentScreen);
            }

            currentScreen = screenToCreate;
            stage.AddChild(currentScreen);
            currentScreen.Start();
        }

    }

    // This is called by unity every frame
    void Update()
    {
        // check if back key was pressed
        if (Input.GetKeyDown(KeyCode.Escape))
        {           
            switch (currentScreen.Type)
            {
                case ScreenType.TitleScreen:
                    {
                        Application.Quit();
                        break;
                    }
                case ScreenType.GameScreen:
                    {
                        GoToScreen(ScreenType.TitleScreen);
                        break;
                    }
            }
        }
    }
}

The Start() method here sets up Futile, sets up a static reference to the instance of Main for easy access by the screens and lastly calls the GoToScreen(ScreenType.TitleScreen) method to get the ball rolling and show the title screen.

GoToScreen() first checks that we aren’t already on the screen that has been requested. Next up it creates an instance of new screen. If there is an existing screen it removes it from the stage (so it gets garbage collected). It then adds the new screen to the stage and calls it’s Start() method so the screen can set itself up.

One thing to note is that I currently only have the TitleScreen and GameScreen plumbed in. The switch statement will need to be expanded for the help and score screens.

Lastly the bit of code in the Update() method is there to allow the back button to work for Android. If I ever port this game to iOS I will need to add some on screen buttons to achieve the same thing.

Here is a clip of this all in action:

YouTube Preview Image


The next post in this series can be found here

Word War III – Dev Diary – 02: Word Smithing

So I need to find some words, more importantly I need a list of words that gradually gets more and more difficult to guess.

So what makes a word hard to guess? Doing some research on the web turns up a couple of interesting posts such as this one and this one.

It turns out that short words are harder to guess, especially ones that have “non-obvious” letters. Thus words such as “jazz”, “jug”, “by” and “gym” are much harder to guess then words such as “deployments”, “historical” or “compartmentalised”.

The list of words I have decided to use scores each word based on the relative frequencies of letters in the English language.

So “jazz” scores: j(0.153) + a(8.167) + z(0.074) = 8.394.

Whereas “deployments” scores: d(4.253) + e(12.702) + p(1.929) + l(4.025) + o(7.507) + y(1.974) + m(2.406) + n(6.749) + t(9.056) + s(6.327) = 56.928.

Lower scores indicate words that are harder to guess when you have a limited number of turns.

Letter frequency for the English language – source Wikipedia

As the blog post points out this algorithm is not perfect “cup” scores 7.469 but “gym” scores 6.396. The reality is that if “_y_” is guessed ( players often work through the vowels and then onto “Y”) there isn’t a lot of options but “gym”. However if you guess “_u_” there is quite a lot of options besides “cup”. So actually “cup” should be a harder word to guess then “gym”.

However for my purposes this list will do very nicely. Unfortunately it’s 173528 words long which is a wee bit bigger then I need :) Also my design only allows me to display words with a length of 10 characters or less so I need to cull words longer then 10 characters as well.

Enter the pig

Apache Pig is something that I have used in the past when working with “Big Data” datasets. The word list isn’t exactly Big Data but Pig will happily suit my word list mangling needs.

First off I only want words that are between 2 and 10 characters. Next I only want a sample of the 173528 words. Lastly I want the list sorted from easiest to hardest. Here is my script:

allWords = LOAD 'allscores.txt' USING PigStorage() AS (word:chararray, junk, score:float);
lessThen10 = FILTER allWords BY SIZE(word) <= 10 AND SIZE(word) > 1;
shortList = SAMPLE lessThen10 0.02;

groupAll = GROUP shortList ALL;
wordsWithMaxScore = FOREACH groupAll GENERATE FLATTEN(shortList), MAX(shortList.score) AS maxScore;

wordsWithRatio = FOREACH wordsWithMaxScore GENERATE shortList::word AS word,shortList::score AS score,
                 maxScore, (shortList::score/maxScore) AS ratio;

ordered = ORDER wordsWithRatio BY ratio DESC;
justWords = FOREACH ordered GENERATE word;

STORE ordered INTO 'wordsAndScores' USING PigStorage();
STORE justWords INTO 'words' USING PigStorage();

This produces two files, one with the words, their scores and a calculated ratio (0 to 10) based on the words score vs the maximum score in the sample list of words (wordsAndScores):

tendrilous 66.33   66.33   1.0
breathings  65.555  66.33   0.988316
rediscount  65.087  66.33   0.9812603
inoculated  64.965  66.33   0.979421
atrophies   64.735  66.33   0.9759535
stewarding  64.582  66.33   0.9736469
tailenders  64.232  66.33   0.96837026
nonethical  64.048  66.33   0.9655962
authorized  63.564  66.33   0.9582994
destroying  63.537  66.33   0.9578923

The second file (words) contains just the words:

tendrilous
breathings
rediscount
inoculated
atrophies
stewarding
tailenders
nonethical
authorized
destroying

Each file contains 2477 words sampled out of the original list of 173k words.

I was initial going to use the ratio to group blocks of similar difficulty words together but have abandoned this idea. The plan is now to simply step through the list in random increments which will have the effect of gradually increasing the difficulty of the words during a game but not result into too many words repeating between games.

One problem with the list is that it contains words that are not in common usage for example “tendrilous” (adjective for “tendril”, a specialized threadlike leaf or stem that attaches climbing plants to a support by twining or adhering) and “kohlrabies” (plural of “kohlrabi”, A cabbage of a variety with an edible turnip like swollen stem). So I will need to manually groom the list at some stage :)

Loading the word list

Loading the word list in Unity is pretty straight forward. Firstly I copy the file into my project’s resource folder and name it words.txt, next I use the following code to load the words into a string list:

List words;

void LoadWordList()
{
    words = new List ();
    StringReader reader = null;

    TextAsset words = (TextAsset)Resources.Load("words", typeof(TextAsset));

    reader = new StringReader (words.text);
    if (reader == null)
    {
        Debug.Log("words.txt not found or not readable");
    } else
    {
        string txt;

        // Read each line from the file
        while ((txt = reader.ReadLine()) != null)
        {
            words.Add(txt);
        }
    }

    Debug.Log("Loaded " + words.Count + " words");
}

With the word list in place, I think I will next focus on getting the game’s screen flows sorted. Onwards and upwards!

_Update: _Click here for the next post in this series